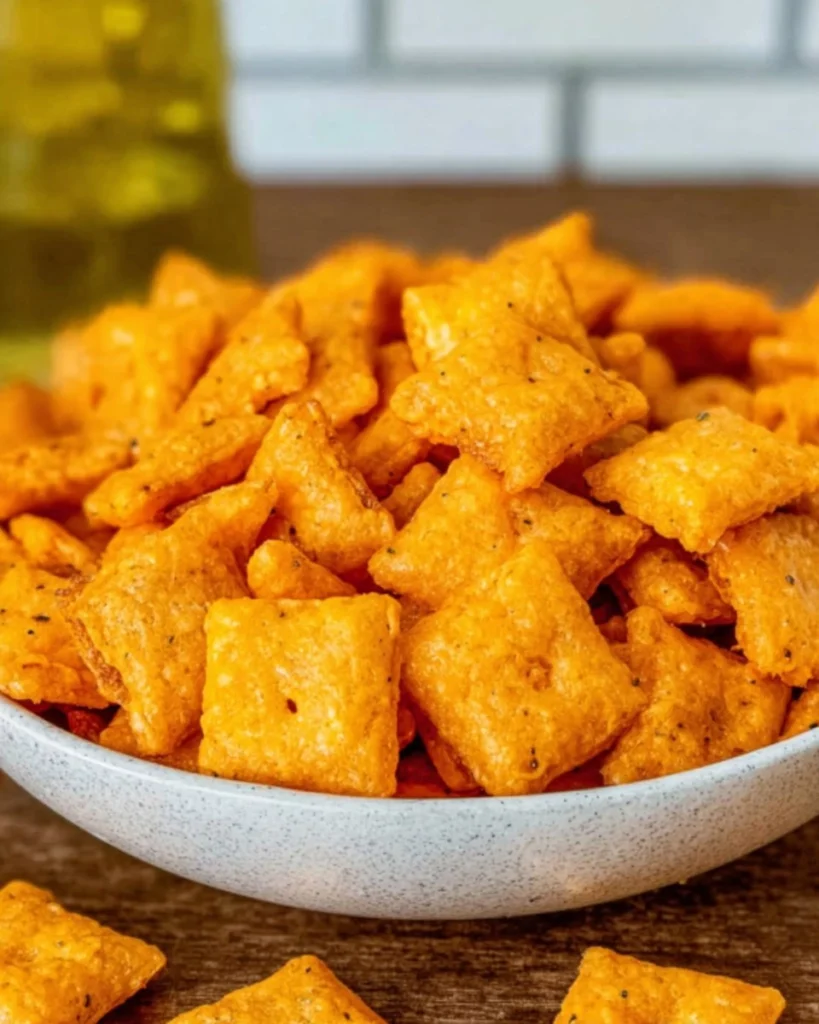
Homemade Cheez-Its are an irresistible blend of crispy, cheesy goodness that no craving can resist. Picture the golden squares, perfectly baked until every bite crunches pleasantly with a burst of sharp cheddar flavor. Unlike their store-bought counterparts, which often come loaded with preservatives, these little snacks are made from simple ingredients that you probably already have in your kitchen. The beauty of making your own cheese crackers lies in the ability to customize them according to your taste—whether you prefer that classic cheddar, a sprinkle of paprika for extra zest, or simply a delightful crunch to accompany your favorite dip.

I’ll never forget the first time I pulled a batch from the oven, the aroma wafting through my kitchen, whisking me back to childhood snacks with a grown-up twist. Sharing these Homemade Cheez-Its with friends and family quickly became a favorite; I mean, who wouldn’t love a homemade snack that’s both budget-friendly and delectable? Plus, the joy of offering something you made from scratch makes it taste even better. I can hardly wait for you to try this easy snack recipe—your taste buds will thank you!
Why You’ll Love This Recipe
- Simple & Quick: Just 15 minutes of prep and 30 minutes of baking time—perfect for satisfying cravings.
- Irresistible Flavor: The combination of sharp cheddar with a hint of salt results in a cheesy explosion in every crunchy bite.
- Eye-Catching Appeal: Those delightful golden squares are as fun to eat as they are to make, adding charm to any snack table.
- Flexible Serving: Ideal for movie nights, game days, or simply as a quick snack throughout the day.
- Diet-Friendly Options: Easily adjust ingredients for gluten-free alternatives, using a 1:1 flour substitute to cater to specific dietary needs.
Ingredients You’ll Need
- 2 cups sharp cheddar cheese: Freshly shredded provides the best flavor and melt. Feel free to mix cheeses, like pepper jack, for a twist.
- 1 cup all-purpose flour: This forms the base of your crackers, giving them that satisfying crunch. Substituting with a gluten-free flour is an option.
- 4 tablespoons cold butter: Cold butter ensures a flaky texture; don’t substitute with softened butter, as it will change the texture.
- 1/2 teaspoon salt: This enhances the flavor of the cheese, bringing every element together.
- 2–3 tablespoons cold water: Used to bind the dough; add just enough to bring it together without making it sticky.
- optional: 1/4 teaspoon paprika or garlic powder: Add these for flavor enhancement if you’re feeling adventurous!
How to Make Cheez-Its
- Mix the Dough: In a mixing bowl, combine 2 cups sharp cheddar cheese, 1 cup all-purpose flour, and 1/2 teaspoon salt. Cut in 4 tablespoons cold butter until the texture resembles coarse crumbs.
- Bind the Dough: Gradually add 2–3 tablespoons cold water, one tablespoon at a time, until the mixture clumps into a cohesive dough.
- Chill: Shape the dough into a ball, wrap it in plastic, and refrigerate for 20–30 minutes to firm it up.
- Prepare the Oven: Preheat your oven to 350°F (175°C) while your dough chills.
- Roll Out the Dough: Lightly flour your working surface and roll out the chilled dough to about 1/8 inch thickness.
- Cut the Crackers: Using a sharp knife or pizza cutter, slice the dough into small squares. Aim for uniformity for even baking!
- Poke Holes: Poke a small hole in the center of each cracker to help them bake evenly and to prevent puffing.
- Bake: Transfer the squares to a parchment-lined baking sheet and bake for 12–15 minutes or until the edges are lightly golden.
- Cool Down: Let them cool on the baking sheet for about 10 minutes to allow them to crisp up.
Storing & Reheating
Allow your Homemade Cheez-Its to cool completely before storing them in an airtight container at room temperature for up to one week. If you want them to last longer, freezing is an option! Just pop them into a freezer-safe bag or container for up to three months. When you’re ready to snack, a quick reheat in the oven at 350°F (175°C) for about 5 minutes will refresh their crunch, though keep in mind the flavor may slightly mellow over time.
Chef’s Helpful Tips
- Avoid overworking the dough; mixing just until combined helps keep the crackers light and crispy.
- Ensure your butter is cold for the best texture. You can even freeze it for a few minutes if necessary.
- Roll the dough evenly for consistent baking. If it’s too thick, your crackers can end up chewy rather than crispy.
- Experiment with herbs or spices mixed into the dough for extra flavor, such as dried rosemary or black pepper for a herbaceous kick.
- If you prefer larger or thicker crackers, adjust your baking time accordingly to ensure they cook through.
Indulging in Homemade Cheez-Its means enjoying a snack that brings joy in every crisp bite. These cheesy delights not only satisfy cravings but also offer room for creativity. Feel free to experiment, maybe tossing in your favorite seasonings or playing with different cheese varieties! No matter how you make them, you’ll be left with a crowd-pleasing treat that’s sure to be a staple in your snack rotation. So roll up those sleeves and get ready to fill your kitchen with the welcoming aroma of freshly baked crackers!

Recipe FAQs
Can I use pre-shredded cheese?
While you can use pre-shredded cheese, freshly shredded cheese is recommended for superior flavor and better melting, as pre-shredded varieties often contain anti-caking agents that can affect texture.
How do I make these crackers gluten-free?
You can replace the all-purpose flour with a gluten-free flour blend, ensuring it measures one-for-one with regular flour. Check the blend’s ingredients to make sure it works well in baking.
Can I store these Cheez-Its for longer?
Yes! These crackers can be kept in an airtight container at room temperature for up to a week or frozen for up to three months. Just make sure they’re completely cooled before storage.
What’s the best way to reheat Cheez-Its?
To revive your Cheez-Its after storage, preheat your oven to 350°F (175°C) and bake them for about 5 minutes. This will help bring back their delightful crispiness!
Print
Cheez-Its
These Cheez-Its are perfect for snacking and packed with irresistible flavor. Made from sharp cheddar and simple ingredients, they are easy to prepare and fun to eat!
- Total Time: 45 minutes
- Yield: 4 servings 1x
Ingredients
- 2 cups sharp cheddar cheese (freshly shredded)
- 1 cup all-purpose flour
- 4 tablespoons cold butter
- 1/2 teaspoon salt
- 2–3 tablespoons cold water
- optional: 1/4 teaspoon paprika or garlic powder for extra flavor
Instructions
- In a mixing bowl, combine shredded cheddar cheese, flour, salt, and cold butter.
- Mix until the texture becomes crumbly.
- Add cold water gradually, one tablespoon at a time, until the dough comes together.
- Form the dough into a ball, wrap it, and refrigerate for 20–30 minutes.
- Preheat oven to 350°F (175°C).
- Roll out the dough on a floured surface to about 1/8 inch thickness.
- Cut into small squares using a knife or pizza cutter.
- Poke a small hole in the center of each square.
- Place on a parchment-lined baking sheet.
- Bake for 12–15 minutes until edges are lightly golden.
- Let cool for 10 minutes before serving to allow crisping.
Last Step:
Please leave a rating and comment letting us know how you liked this recipe! This helps our business to thrive and continue providing free, high-quality recipes for you.Notes
Ensure the cheese is freshly shredded for best flavor and texture.
For added flavor, consider mixing in garlic powder or paprika.
These can be stored in an airtight container for several days.
- Prep Time: 15 minutes
- Cook Time: 30 minutes
- Category: Snack
- Method: Baking
- Cuisine: American
Nutrition
- Serving Size: 1 oz
- Calories: 150
- Sugar: 0g
- Sodium: 200mg
- Fat: 10g
- Saturated Fat: 6g
- Unsaturated Fat: 3g
- Trans Fat: 0g
- Carbohydrates: 12g
- Fiber: 0g
- Protein: 4g
- Cholesterol: 30mg