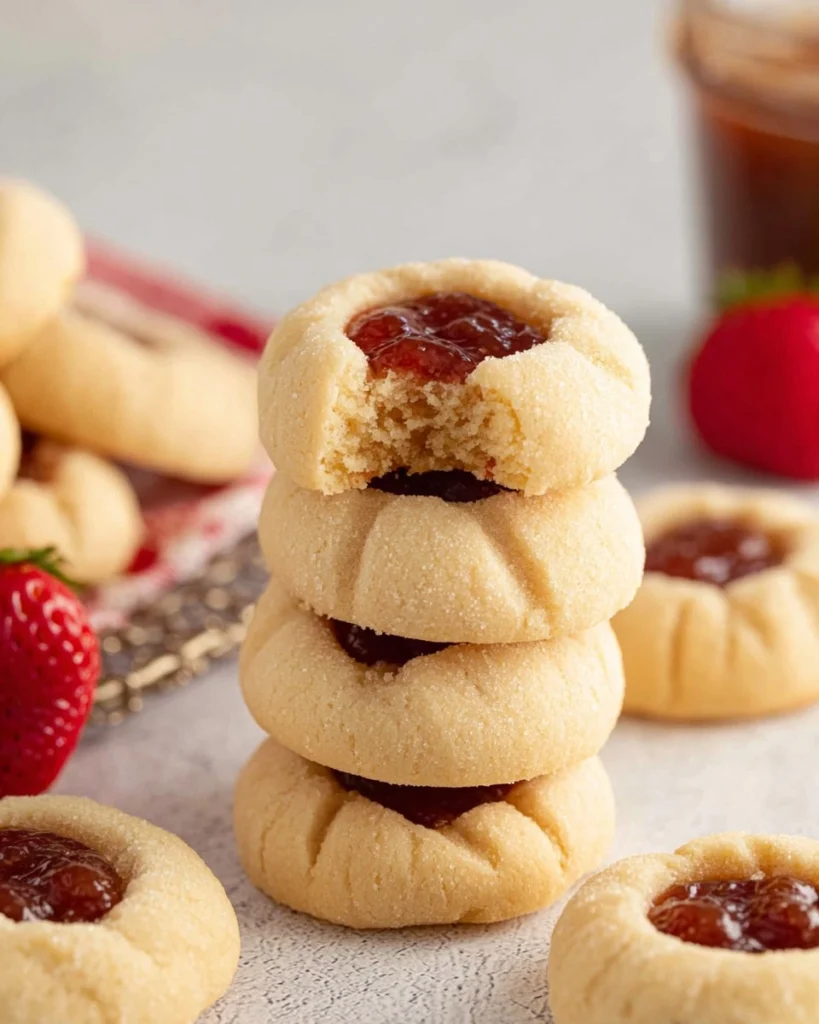
Thumbprint cookies are a delightful mix of buttery goodness and fruity perfection. With their distinct shape and inviting appearance, these little gems often remind me of cozy afternoons spent baking in the kitchen. The tender texture and a burst of flavor from the jam make each bite an absolute treat for the senses. There’s something undeniably special about the way the sweetness of the jam beautifully complements the rich melting butter, which just melts in your mouth. Forget those store-bought treats; these homemade thumbprint cookies steal the show.

I first stumbled upon thumbprint cookies at a friend’s holiday gathering, where they were the star of the dessert table. The unique shape and burst of vibrant color caught my eye, and the first bite had me hooked. Now, I make them during festive occasions and family get-togethers. These cookies are incredibly easy to whip up, and they always impress guests. If you’re seeking a recipe that combines simplicity with mouthwatering flavor, you’re in for a treat! Let’s dive into why you’ll love these thumbprint cookies.
Why You’ll Love This Recipe
- Simple & Quick: Ready in just over an hour, you can enjoy homemade cookies without spending all day in the kitchen.
- Irresistible Flavor: The soft, buttery dough pairs perfectly with the jam’s sweetness, creating a lovely balance.
- Eye-Catching Appeal: These cookies are not just delicious; their little “thumbprint” captures the eye and makes them stand out.
- Flexible Serving: Perfect for sharing at parties, pack lunches, or savoring with coffee during quiet moments.
- Diet-Friendly Options: With a few twists, you can easily adapt these cookies for gluten-free or vegan diets.
Ingredients You’ll Need
- 1 cup (226 grams) unsalted butter, softened: Essential for a rich, buttery flavor. Make sure it’s softened for easy mixing.
- ¾ cup (143 grams) granulated sugar: This sweetener gives the cookies their delightful sweetness and light texture. You can also use coconut sugar for a hint of caramel flavor.
- 2 large egg yolks: These add richness and moisture. Avoid using whole eggs, as the whites can alter the texture.
- 1 teaspoon vanilla extract: Pure vanilla extract enhances the flavor profile, making each cookie taste more aromatic.
- 2 ⅔ cups (320 grams) all-purpose flour: Provides structure to the cookies. If you need a gluten-free option, almond flour works surprisingly well.
- 2 tablespoons (15 grams) cornstarch: This ingredient creates a tender cookie that melts in your mouth — don’t skip it!
- ¼ teaspoon salt: A little salt balances the sweetness beautifully.
- ½ cup jam or preserves of your choice: Choose your favorite flavor—strawberry, raspberry, or apricot all work wonderfully.
How to Make Thumbprint Cookies
-
Cream the Butter: In a large mixing bowl, use an electric mixer to cream the 1 cup unsalted butter until smooth and lump-free. Next, blend in ¾ cup granulated sugar until light and fluffy, making sure to scrape down the bowl for even mixing.
-
Add Egg Yolks and Vanilla: Beat in the 2 large egg yolks and 1 teaspoon vanilla extract, mixing until well combined.
-
Incorporate Dry Ingredients: Gradually add half of the 2 ⅔ cups all-purpose flour, the 2 tablespoons cornstarch, and ¼ teaspoon salt. Mix until the dough starts to gather together, then add the remaining flour, mixing until the dough feels smooth but crumbly — perfect texture, not sticky!
-
Shape the Cookies: Use a medium cookie scoop to portion out level scoops of dough. Roll each scoop into a ball with your hands until they are round and smooth. For a little extra sweetness, roll these dough balls in granulated sugar.
-
Create Indentations: Place the dough balls about 1 inch apart on a parchment-lined baking sheet. With the back of a ½ teaspoon measuring spoon (dipped in flour to prevent sticking), gently press down to create round indentations in each ball.
-
Fill with Jam: If your jam is firm, stir it to loosen it up. Spoon about 1 teaspoon of your chosen jam into the indentation of each cookie.
-
Chill the Cookies: Refrigerate the cookie tray for at least 45 minutes. This step is crucial as it helps maintain the cookie shape during baking.
-
Bake Them Up: Preheat your oven to 375°F. While it heats up, line two large cookie sheets with parchment paper. Arrange the chilled cookies on one sheet, leaving about 2 inches of space between each. Bake for 13-15 minutes, until the edges start to turn golden.
-
Cool and Enjoy: Allow them to rest on the baking sheet for about 15 minutes before transferring to a cooling rack. Let them cool completely before enjoying or storing.
Storing & Reheating
Store your thumbprint cookies at room temperature in an airtight container for up to a week to retain their softness. If you want to keep them longer, you can refrigerate them for about two weeks or freeze them for up to three months. For freezing, layer the cookies between sheets of parchment paper in a freezer-safe container. To refresh them, gently reheat in the oven at 350°F for about 5 minutes, and watch them become wonderfully soft again.
Chef’s Helpful Tips
- Avoid Overmixing: When incorporating flour, mix just until combined to maintain a tender texture.
- Room Temperature Ingredients: Using softened butter and room temperature egg yolks ensures better incorporation and a smoother dough.
- Customize Jam: Feel free to experiment with different jams or even chocolate ganache for a delicious twist!
- Press Lightly: When creating indentations, be gentle to prevent cracks in the dough.
- Make Ahead: You can prepare the dough ahead of time and refrigerate it until you’re ready to bake.
There’s a certain magic in baking thumbprint cookies—a mix of nostalgia and delightful flavors that evoke warm memories. Whether sharing them with loved ones or enjoying a quiet moment with a cup of tea, these cookies are sure to bring a smile to everyone. Don’t hesitate to experiment with different jams and flavors to create your own signature version. I can’t wait for you to enjoy this classic recipe; it’s truly a joy to make and share!

Recipe FAQs
Can I make thumbprint cookies gluten-free?
Absolutely! You can substitute the all-purpose flour with a gluten-free flour blend, ensuring that it measures cup for cup. Be cautious with the texture, as gluten-free flours can vary.
What types of jams work best?
You can use any jam or preserve that you enjoy! Classic options include raspberry, strawberry, or apricot. Feel free to explore unique flavors like fig or blueberry for something different.
How long do these cookies last?
Thumbprint cookies can be stored at room temperature in an airtight container for up to a week. If you refrigerate them, they can last for about two weeks. For long-term storage, freeze them for up to three months.
What should I do if my dough is too sticky?
It might be that your butter wasn’t soft enough or that you added too much flour. If the dough feels sticky, chill it in the refrigerator for about 30 minutes to stiffen up before shaping the cookies.
Print
Thumbprint Cookies
These thumbprint cookies are a delightful treat with a rich buttery flavor and sweet jam center. Easy to prepare, they are perfect for family gatherings or any dessert table.
- Total Time: 1 hour 14 minutes
- Yield: 25 cookies 1x
Ingredients
- 1 cup (226 grams) unsalted butter, softened
- ¾ cup (143 grams) granulated sugar, plus 3 tablespoons to roll the cookies in (optional)
- 2 large egg yolks
- 1 teaspoon vanilla extract
- 2 ⅔ cups (320 grams) all-purpose flour, spooned and leveled
- 2 tablespoons (15 grams) cornstarch
- ¼ teaspoon salt
- ½ cup jam or preserves of your choice
Instructions
- Cream the butter in a large mixing bowl with an electric mixer until smooth. Mix in the sugar until light and fluffy.
- Add the egg yolks and vanilla extract, mixing until combined.
- Mix in half of the flour, cornstarch, and salt. Once incorporated, add the remaining flour and mix until you have a crumbly dough that is smooth to touch.
- Scoop out level dough using a medium cookie scoop, roll into smooth balls, and optionally roll in granulated sugar.
- Place the dough balls on a parchment-lined baking sheet, about 1 inch apart. Press an indentation in each ball using a flour-dipped measuring spoon.
- Fill each indentation with about 1 teaspoon of jam and refrigerate for at least 45 minutes.
- Preheat oven to 375°F. Line two cookie sheets with parchment paper and place chilled cookies about 2 inches apart on one of the sheets.
- Bake for 13-15 minutes until the edges are golden. Let cool on the sheet for 15 minutes before transferring to a rack.
Last Step:
Please leave a rating and comment letting us know how you liked this recipe! This helps our business to thrive and continue providing free, high-quality recipes for you.Notes
Chilling the cookies helps them hold their shape while baking.
Feel free to use any flavor of jam you prefer for a personalized touch.
Store in an airtight container to keep them fresh longer.
- Prep Time: 30 minutes
- Cook Time: 44 minutes
- Category: Dessert
- Method: Baking
- Cuisine: American
Nutrition
- Serving Size: 1 cookie
- Calories: 128
- Sugar: 6g
- Sodium: 45mg
- Fat: 7.0g
- Saturated Fat: 4.5g
- Unsaturated Fat: 1.5g
- Trans Fat: 0.0g
- Carbohydrates: 15g
- Fiber: 0.5g
- Protein: 1.5g
- Cholesterol: 25mg