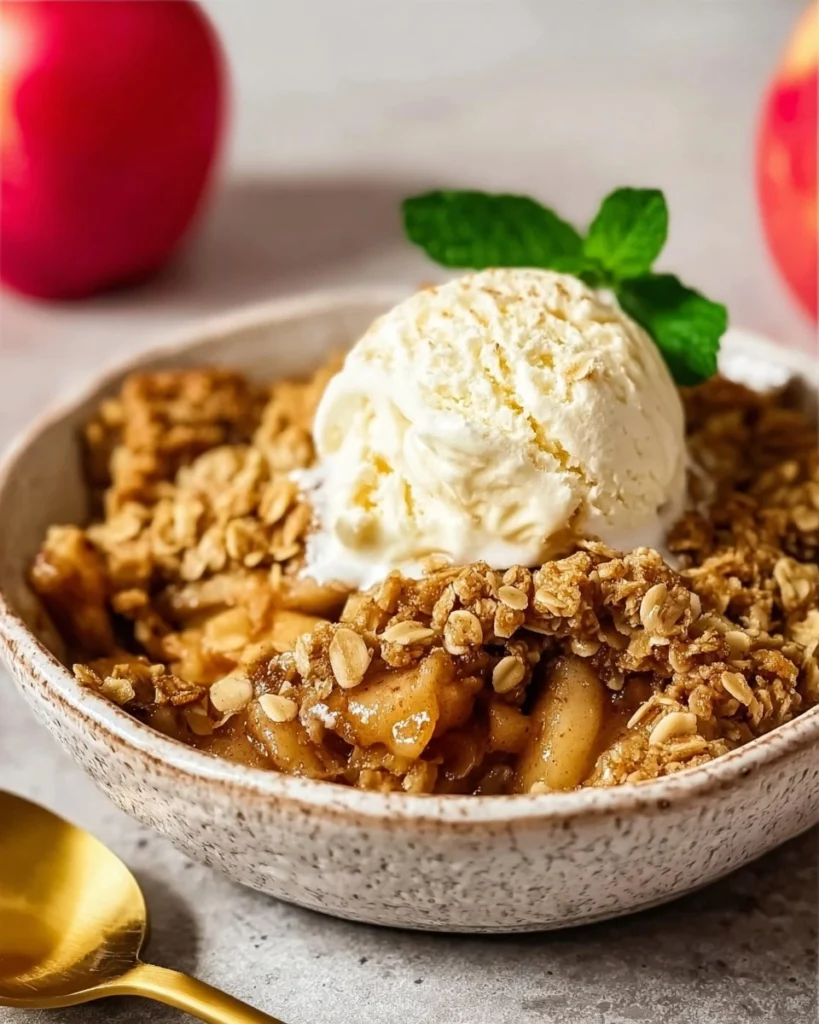
Old-Fashioned Apple Crisp is something quite special—layers of soft, cinnamon-spiced apples topped with a buttery, oat-studded crisp. It’s the epitome of comfort in dessert form, perfect for cozy evenings or family gatherings. With each warm bite, you’re transported to a simpler time, where desserts were lovingly made from scratch and enjoyed with those you love. This classic apple crisp recipe is incredibly easy to make, and it calls for ingredients that you probably already have in your pantry.

Many store-bought apple desserts just can’t capture the same warmth and nostalgia that homemade apple crisp delivers. The smell of fresh apples baking in cinnamon as it’s pulled from the oven is truly irresistible. Plus, this recipe is budget-friendly, making it a great option for a last-minute treat that’s sure to impress. Give it a try, and you’ll understand why this cozy dessert is a staple in many homes!
Why You’ll Love This Recipe
- Simple & Quick: With only 15 minutes of prep, you can have this warm dessert ready to enjoy in no time.
- Irresistible Flavor: The combination of sweet apples and warm spices creates a mouthwatering flavor that’s simply unmatched.
- Eye-Catching Appeal: The golden-brown topping is not only comforting but also looks beautiful when served warm from the oven.
- Flexible Serving: Perfect for dessert, a special breakfast, or an afternoon snack with a scoop of vanilla ice cream.
- Diet-Friendly Options: You can easily swap in gluten-free oats and flour for a delightful gluten-free version.
Ingredients You’ll Need
- 5–6 cups apples (peeled and sliced): Choose a mix of sweet and tart apples like Honeycrisp, Granny Smith, or Fuji for depth of flavor.
- 1/2 cup granulated sugar: Enhances the sweetness of the apples so that the peach filling is perfectly balanced.
- 1/2 cup brown sugar: Adds a touch of caramel richness which complements the apple’s flavor beautifully.
- 1 cup all-purpose flour: This gives the topping its structure and helps create that delightful crisp texture.
- 1 cup rolled oats: For a hearty crunch, rolling oats soak up the apple juices, contributing to the topping’s chewy bite.
- 1/2 cup butter (melted): This binds everything together and gives that delicious buttery richness to the topping.
- 1 teaspoon cinnamon: The classic flavor that brings warmth and a cozy aroma to your apple crisp.
- 1/2 teaspoon nutmeg (optional): This adds a hint of aromatic spiciness, enhancing the overall flavor profile.
How to Make Old-Fashioned Apple Crisp
- Preheat the oven: Start by setting your oven to 350°F (175°C) so it’s ready to puff up that crisp.
- Prepare the apples: Peel and slice your apples evenly, aiming for about ¼-inch slices to ensure they cook evenly.
- Mix apples with sugar: In a large bowl, toss the sliced apples with 1/2 cup granulated sugar, 1 teaspoon cinnamon, and 1/2 teaspoon nutmeg (if using) until well coated.
- Transfer to baking dish: Carefully transfer the apple mixture into a greased baking dish, spreading it evenly.
- Combine dry ingredients: In another bowl, whisk together 1 cup all-purpose flour, 1 cup rolled oats, and 1/2 cup brown sugar until it’s nicely blended.
- Create the topping: Pour the 1/2 cup melted butter over the flour mixture and stir until crumbles form; this is where the magic happens!
- Spread topping: Evenly distribute the crumbly topping over the apples, making sure to cover all the fruit.
- Bake: Place the baking dish in the oven and bake for 35–40 minutes, or until the topping is golden brown and the apples are bubbling around the edges.
- Cool before serving: Allow the apple crisp to cool slightly before serving, giving the juices a chance to settle.
Storing & Reheating
To store your homemade apple crisp, place it in an airtight container and keep it at room temperature for up to 2 days. If you prefer, refrigerate it in a covered container for up to a week. For longer storage, you can freeze apple crisp for up to 3 months. When ready to enjoy, pop it in the oven at 350°F (175°C) for about 20 minutes to warm up, taking care that it stays covered so it doesn’t dry out. The flavors may soften a little in texture, but it’ll still taste wonderful!
Chef’s Helpful Tips
- Make sure your apples are fresh; they hold their shape better and provide a firmer texture in the dessert.
- Using a mix of apple varieties can enhance the flavor profile and create a more complex filling.
- For extra texture, consider adding chopped nuts (like walnuts or pecans) into the topping mix.
- If you notice the topping browning too quickly while baking, cover it loosely with foil to prevent burning.
- Feel free to experiment with spices; cardamom or allspice can add an interesting twist.
- This dessert can also be made ahead of time and baked right before serving for a fresh-from-the-oven experience.
There’s something undeniably comforting about Old-Fashioned Apple Crisp. Its warm, sweet scent and satisfying crunch make it a favorite for many occasions, from family gatherings to cozy nights in. The simplicity of the preparation, combined with the delightful outcome, makes it a recipe you’ll return to time and again. Don’t hesitate to mix flavors or experiment with toppings to make it your own!

Recipe FAQs
Can I use frozen apples for this recipe?
Absolutely! You can use frozen apples, but be sure to thaw and drain any excess moisture before mixing them with sugar and spices. This will help prevent your apple crisp from becoming too watery during baking.
What can I serve with apple crisp?
Apple crisp pairs wonderfully with a scoop of vanilla ice cream or whipped cream for a delicious contrast. For a fun twist, try serving it with caramel sauce or a drizzle of crème fraîche!
How can I make my apple crisp gluten-free?
Simply substitute the all-purpose flour with a gluten-free blend and ensure your oats are certified gluten-free. The taste and texture will still be delightful!
How do I know when my apple crisp is done?
Your apple crisp is done when the topping is golden brown and the edges bubble. The apples should be fork-tender but not mushy. Enjoy this warm dessert fresh from the oven for the best texture!
Print
Old-Fashioned Apple Crisp
This Old-Fashioned Apple Crisp features fresh apples and a buttery crumble that creates a delightful dessert. It’s simple to make and perfect for family gatherings or a cozy evening treat.
- Total Time: 1 hour 10 minutes
- Yield: 6 servings 1x
Ingredients
- 5–6 cups apples (peeled and sliced)
- 1/2 cup granulated sugar
- 1/2 cup brown sugar
- 1 cup all-purpose flour
- 1 cup rolled oats
- 1/2 cup butter (melted)
- 1 teaspoon cinnamon
- 1/2 teaspoon nutmeg (optional)
Instructions
- Preheat the oven to 350°F (175°C).
- Peel and slice the apples evenly.
- In a large bowl, mix the apples with granulated sugar, cinnamon, and optional nutmeg.
- Transfer the apple mixture into a greased baking dish.
- In another bowl, combine flour, oats, and brown sugar.
- Pour melted butter over the dry ingredients and mix until crumbly.
- Spread the crumbly topping evenly over the apples.
- Bake for 35–40 minutes or until golden brown.
- Let cool slightly before serving.
Last Step:
Please leave a rating and comment letting us know how you liked this recipe! This helps our business to thrive and continue providing free, high-quality recipes for you.Notes
For a sweeter dish, add more sugar to the apple mixture.
Serve warm with ice cream for an extra treat.
Feel free to mix in other fruits like berries for variety.
- Prep Time: 15 minutes
- Cook Time: 55 minutes
- Category: Dessert
- Method: Baking
- Cuisine: American
Nutrition
- Serving Size: 1 serving
- Calories: 300
- Sugar: 20g
- Sodium: 150mg
- Fat: 12g
- Saturated Fat: 7g
- Unsaturated Fat: 3g
- Trans Fat: 0g
- Carbohydrates: 47g
- Fiber: 4g
- Protein: 3g
- Cholesterol: 30mg