Turkey gravy made from drippings is a staple that brings charm to any holiday feast. Imagine a table surrounded by loved ones, laughter filling the air, and that delicious aroma wafting through your home as the turkey roasts. And there it is, the crowning glory of your meal: a rich, velvety gravy made from the drippings of your perfectly roasted turkey. This guide will walk you through how to make turkey gravy from drippings, ensuring you capture all the wonderful flavors that can only come from the pan. It’s a simple process involving just a few key ingredients. So, roll up your sleeves, and let’s create a comforting addition to your holiday meal that will make your guests rave about your culinary skills.
Why This Recipe Works
Turkey gravy made from drippings is the quintessential accompaniment for Thanksgiving, showcasing the depth of flavor from your roasted turkey. This recipe capitalizes on the savory goodness left in the pan, turning it into a smooth and rich gravy that elevates any dish it graces. Using the drippings ensures that every spoonful is packed with that delicious turkey flavor, making your meal memorable.
Why You’ll Love This How to Make Turkey Gravy from Drippings
Not only is this turkey gravy easy to whip up, but it’s also deeply satisfying. It’s a culinary tradition that brings comfort and warmth—a natural go-to for those cozy family gatherings. Each spoonful of homemade gravy will have you feeling nostalgic about past celebrations. Plus, making gravy from drippings means you’re minimizing waste and maximizing flavor. It’s as if you’re capturing the essence of your Thanksgiving in one delightful sauce.

Ingredients Needed for Turkey Gravy from Drippings
- 2 ½ cups pan drippings from turkey
- ½ cup all-purpose flour
- 2 teaspoons minced fresh thyme or parsley (optional)
- Kosher salt (to taste)
- Freshly ground black pepper (to taste)
How to Make Turkey Gravy from Drippings

Gather the Pan Drippings
After moving your turkey to a cutting board, carefully collect all the pan drippings from the roasting pan into a large bowl. It’s so important to get every last drop. If desired, strain the drippings through a fine mesh sieve to remove any solid bits. You’ll want a total of 2 ½ cups of drippings; if you’re short, feel free to make up the difference with some chicken broth. This balance of flavors will enrich your gravy, making it even more luscious.
Create the Roux
Next, allow the fat to rise to the top of the collected drippings. Spoon off ½ cup of the fat and transfer it to a large saucepan over medium heat. Gradually whisk in the flour and cook for about 5 minutes, constantly stirring until the mixture turns thick and golden brown. This forms the foundation of your gravy, known as a roux. Don’t rush this step; cooking the roux properly adds that deep, nutty flavor that we’re all looking for.
Build the Gravy
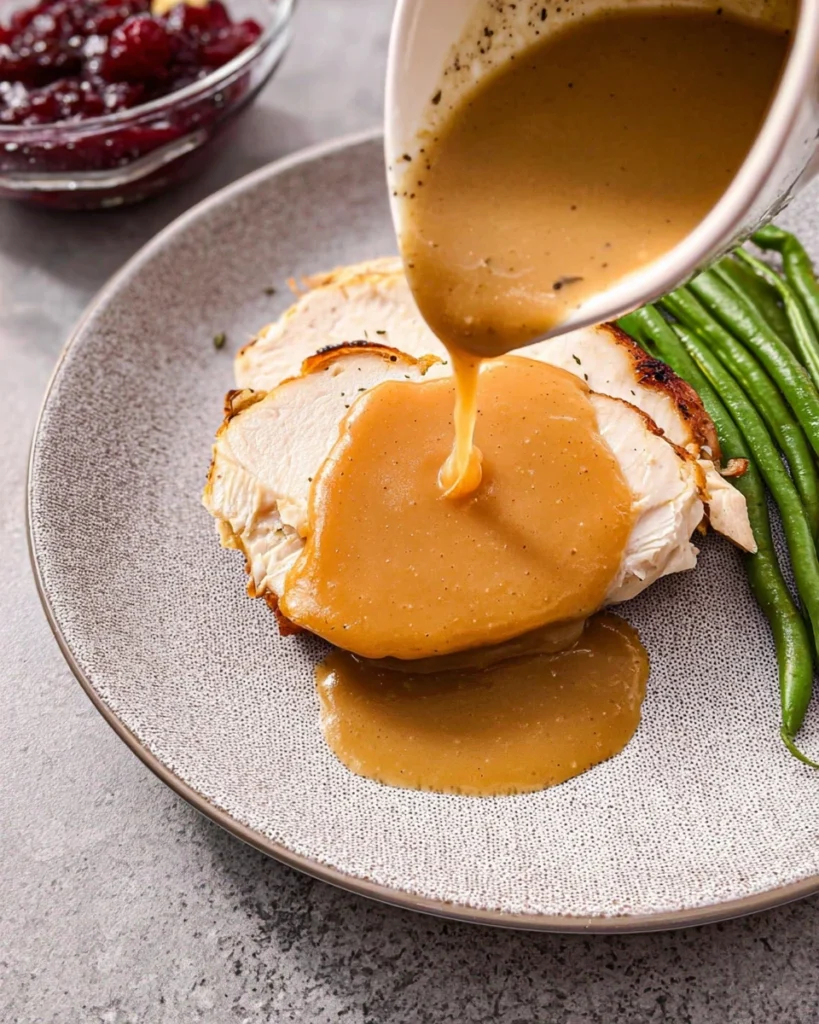
Once your roux has reached a light brown color, it’s time to slowly add the remaining pan drippings to the saucepan, whisking constantly to combine. Let this mixture cook for about 5 to 8 minutes, allowing it to thicken beautifully. You’ll see the color deepen and the gravy become richer. This step not only blends the flavors but also gives your gravy that perfect consistency—smooth and luxurious.
Season to Perfection
Now comes the fun part—seasoning! Add your optional herbs and then season the gravy with kosher salt and freshly ground black pepper to taste. This is where you can really personalize your gravy. If you’re feeling adventurous, toss in a bit of your favorite herbs. Serve immediately for the best experience. Your guests will gather around as the aroma wafts through the air, drawing everyone in.
Serving Suggestions
Enjoy your turkey gravy drizzled over classic mashed potatoes, stuffing, or your roasted turkey slices. It also enhances the flavors of other dishes on your plate, making it a versatile addition to any holiday meal. Think about creating a gravy station with sides like roasted vegetables or biscuits. Everyone can customize their plate, making it even more engaging.
Tips for Success
- Make sure to whisk continuously while adding the drippings; this prevents lumps from forming. A lump-free gravy is always a crowd-pleaser.
- If your gravy is too thick, simply whisk in additional broth or water until you reach the desired consistency. You can always adjust!
- Always taste and adjust the seasoning towards the end of the cooking process for the best flavor. A little taste test here can work wonders.
Variations
- For a creamier gravy, incorporate a splash of heavy cream or milk just before serving. This can add a lovely richness that many people adore.
- Substitute fresh herbs with dried ones if that’s what you have on hand—just remember to use less since dried herbs are more potent. You’ll still get that herbaceous kick.
- Experiment with adding a splash of white wine during the roux-making phase for added depth. It introduces a subtle acidity that can brighten the overall flavor profile.
Storage Tips
- Store any leftover turkey gravy in an airtight container in the refrigerator for up to 3 days. It can be a comforting reminder of holiday meals in a busy week.
- To reheat, gently warm it on the stovetop, adding a bit of broth if it thickens too much. Stir occasionally for even heating and keep an eye on it so it doesn’t scorch.
Pairing Ideas
This turkey gravy pairs perfectly with:
– Classic mashed potatoes
– Homemade stuffing
– Roasted vegetables
– Cranberry sauce
These pairings create a harmonious blend of tastes and textures. The savory richness of the gravy elevates every bite, turning an everyday meal into something special.

FAQs
What can I substitute for turkey drippings?
You can use chicken broth to create a flavorful gravy in a pinch, but it won’t have the same depth as the drippings.
Can I make turkey gravy ahead of time?
Yes! You can prepare gravy a day in advance and reheat it just before serving. Having one less thing to worry about on the big day can be a relief.
How can I thicken my turkey gravy?
If your gravy is too thin, create a slurry by mixing flour with a bit of cold water and whisking it into the gravy. This allows you to thicken it without altering the flavor.
What if my gravy is too salty?
You can balance the saltiness by adding a bit of sugar or additional broth. Small adjustments can make a big difference!
Can I freeze leftover turkey gravy?
Absolutely! Freeze it in an airtight container for up to 3 months. Thaw it in the refrigerator before reheating for the best results.
Enjoy your deliciously rich and flavorful turkey gravy made straight from the drippings. This simple yet satisfying recipe will elevate your Thanksgiving feast, and with its straightforward instructions, you’ll master this traditional favorite in no time. Serve it up warm and watch as it brings everyone together around the table, sparking joy and conversation at your holiday gatherings.
Print
Turkey Gravy from Drippings
This turkey gravy made from drippings is easy to prepare and brings a rich, savory flavor to your holiday table. It captures the essence of roasted turkey and is a comforting addition to any meal.
- Total Time: 25 minutes
- Yield: Serves 4-6 1x
Ingredients
- 2 ½ cups pan drippings from turkey
- ½ cup all-purpose flour
- 2 teaspoons minced fresh thyme or parsley (optional)
- Kosher salt (to taste)
- Freshly ground black pepper (to taste)
Instructions
- Collect pan drippings from the roasting pan into a bowl, straining if desired.
- Spoon off ½ cup of fat from the drippings and heat in a saucepan.
- Whisk in flour and cook until thick and golden brown.
- Slowly add remaining drippings while whisking constantly.
- Cook until thickened, then season with salt, pepper, and optional herbs.
Last Step:
Please leave a rating and comment letting us know how you liked this recipe! This helps our business to thrive and continue providing free, high-quality recipes for you.Notes
Whisk continuously to prevent lumps.
Add broth if gravy is too thick.
Taste and adjust seasoning before serving.
- Prep Time: 10 mins
- Cook Time: 15 mins
- Category: Sauce
- Method: Stovetop
- Cuisine: American
Nutrition
- Calories: 50
- Sugar: 0
- Sodium: 200
- Fat: 3.5
- Saturated Fat: 1
- Unsaturated Fat: 2.5
- Trans Fat: 0
- Carbohydrates: 5
- Fiber: 0
- Protein: 1
- Cholesterol: 10