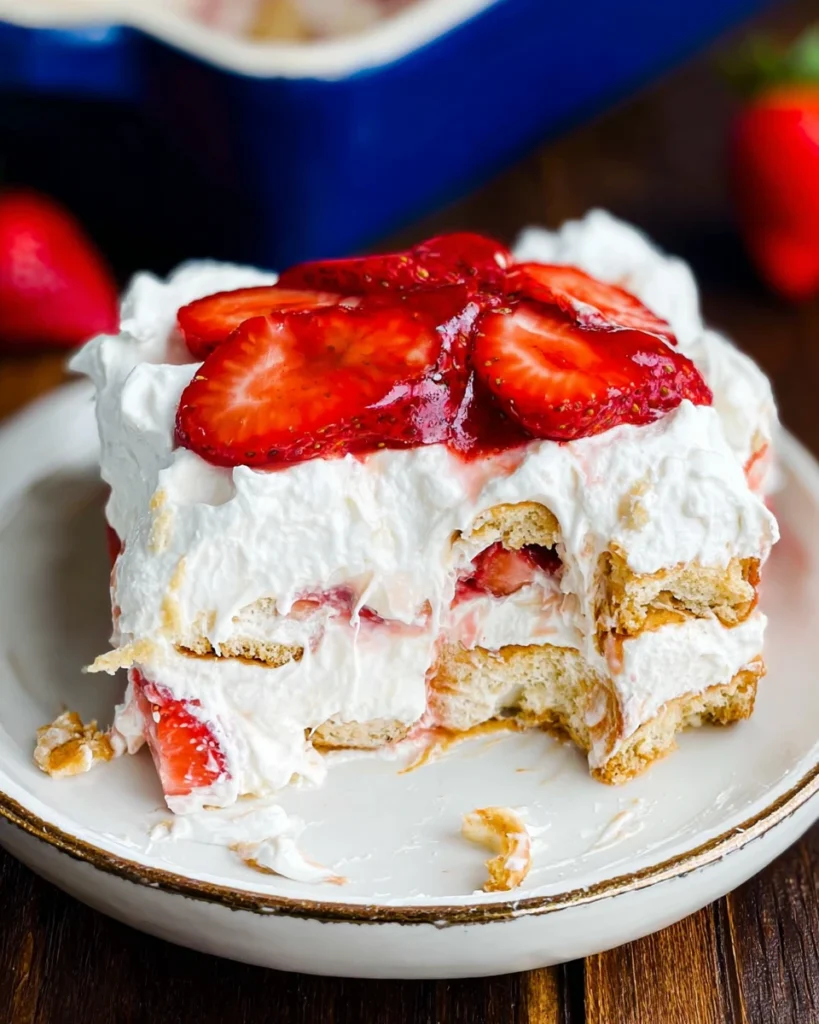
This Strawberry Icebox Cake is a sensational dessert that feels just like summer on a plate. Imagine fluffy layers of whipped cream, sweet strawberries, and the delightful crunch of Nilla Wafers, all coming together in a cool, refreshing treat. There’s something about the combination of these ingredients that brings a wave of nostalgia, reminding many of sunny days spent with loved ones. The best part? You don’t need to turn on the oven to whip up this gem! It’s simple enough for anyone—no complex techniques or fancy gadgets are required. Since it’s a no-bake dessert, you can put it together in no time, then let your fridge do the hard work. So grab those juicy strawberries, and let’s make this heavenly Strawberry Icebox Cake!
Why This Recipe Works
This Strawberry Icebox Cake combines the tropical sweetness of strawberries with the creamy texture of whipped cream and the delightful crunch of Nilla Wafers. Each layer melds beautifully in the refrigerator. This allows the flavors to develop, making it an ideal make-ahead dessert. The no-bake nature and straightforward steps mean it’s suitable for cooks of all skill levels.
Why You’ll Love This Strawberry Icebox Cake
You’ll adore this dessert for several reasons! First, it’s perfect for summer—refreshing, light, and hassle-free. The combination of soft strawberries, sweet creaminess, and crunchy vanilla wafers creates a delectable medley that will satisfy any sweet tooth. Furthermore, it’s a fun dessert to share at gatherings, ensuring compliments all around.

Ingredients
- 8 ounces (226g) cream cheese, room temperature
- ½ cup (57g) powdered sugar
- 1 teaspoon vanilla extract
- 1 cup (237ml) cold heavy whipping cream
- 2 pounds fresh strawberries, hulled and sliced
- 1 (11-ounce) box Nilla Wafers
- Additional whipped cream or Cool Whip for topping
Preparing Your Strawberry Icebox Cake

Create the Cream Mixture
To start, beat the cream cheese in a mixing bowl using a hand mixer until it’s smooth. Gradually incorporate the powdered sugar and vanilla extract, mixing until everything is nicely combined. This step is crucial because it sets the base for the creamy filling, so take your time to ensure a smooth texture.
Whip the Heavy Cream
Next, add the cold heavy whipping cream to the cream cheese mixture. Beat the mixture until it reaches a fluffy consistency that holds its shape. You want it to be thick enough to provide structure but still light enough for an airy mouthfeel. Watching it transform is one of the most satisfying parts!
Layer the Base Ingredients
Now, it’s time to start layering! In a 9×9-inch pan, place a layer of Nilla Wafers along the bottom, ensuring they cover the entire surface. This acts as a flavorful foundation for your cake and will absorb some of the moisture from the cream and strawberries.
Add Strawberries and Cream
After laying down the wafers, distribute a layer of the sliced strawberries over them. Follow this with a portion of the cream cheese mixture, spreading roughly one-third across the strawberries. Make sure to cover all the strawberries so every bite is equally delicious.
Repeat Layering Process
Continue the layering process by adding another layer of Nilla Wafers. Follow this with more strawberries and another portion of the cream mixture. Repeat until you run out of ingredients, ensuring the final layer is the cream. It’s visually appealing, and you won’t want to skimp on any layer since they all contribute to the ultimate flavor.
Chill Before Serving
Now, cover the dessert with plastic wrap or a lid and place it in the refrigerator for at least four hours. This chilling time is essential as it allows the flavors to meld together beautifully, leading to that luscious texture everyone loves.
Prepare for Serving
Before serving, top off your cake with additional whipped cream, or make fresh whipped cream. Just beat ½ cup of heavy whipping cream with 1 tablespoon of powdered sugar until stiff peaks form. Slice the remaining strawberries and arrange them decoratively on top for that final, pretty touch.
Serving Suggestions
Your Strawberry Icebox Cake is perfect served chilled after a hearty summer meal. It’s also a sweet treat for picnics and potlucks. Pair it with a scoop of vanilla ice cream for added indulgence. If you prefer something lighter, serving alongside fresh mint adds an extra refreshing touch that complements the strawberries perfectly.
Tips for Success
- Ensure your cream cheese is at room temperature for easy blending. This helps achieve that smooth, creamy consistency.
- For a thicker mixture, whip the heavy cream until it’s stiffer before integrating it with the cream cheese.
- Change up the fruit by using blueberries or raspberries for a mixed berry twist! The flavor combinations can be exciting and fun.
Variations
- Chocolate Strawberry Icebox Cake: Add layers of chocolate pudding between the strawberries and cream for a richer treat.
- Lemon Zest: Incorporating lemon zest into the cream mixture gives a zesty twist that brightens every bite.
- Nutty Addition: Sprinkle chopped nuts, like almonds or pecans, between layers for added crunch and flavor depth.
Storage Tips
To keep your Strawberry Icebox Cake fresh, just cover it properly and store it in the refrigerator. It should remain good for up to two days. However, avoid freezing it, as the textures will change when thawed.

FAQs
1. Can I use frozen strawberries for this recipe?
Yes, you can, but thaw and drain them well to prevent excess moisture from watering down the cake.
2. How can I make this recipe gluten-free?
Substitute Nilla Wafers with a gluten-free cookie alternative like gluten-free vanilla wafers or ladyfingers.
3. Is there an alternative to heavy whipping cream?
You could use a blend of Greek yogurt and whipped topping for a lighter twist without compromising flavor.
4. How do I know when the cream is whipped enough?
The cream should form stiff peaks when beaten properly. It should hold its shape nicely when lifted.
5. Can this be made in advance?
Absolutely! It often tastes better when made a day ahead as the flavors deepen and blend nicely.
This Strawberry Icebox Cake is not only a delightful addition to any summer gathering, but it’s also an easy recipe that allows you to showcase seasonal fruits beautifully. Its layers of flavor and texture guarantee a memorable dessert that guests will love. Enjoy every refreshing bite!
Print
Strawberry Icebox Cake
This Strawberry Icebox Cake is a refreshing, no-bake dessert that combines fluffy whipped cream, sweet strawberries, and crunchy Nilla Wafers. Perfect for summer gatherings!
- Total Time: 30 minutes
- Yield: 8 servings 1x
Ingredients
- 8 ounces (226g) cream cheese, room temperature
- ½ cup (57g) powdered sugar
- 1 teaspoon vanilla extract
- 1 cup (237ml) cold heavy whipping cream
- 2 pounds fresh strawberries, hulled and sliced
- 1 (11-ounce) box Nilla Wafers
- Additional whipped cream or Cool Whip for topping
Instructions
- Beat cream cheese until smooth. Gradually mix in powdered sugar and vanilla extract.
- Add cold heavy whipping cream and beat until fluffy.
- Layer Nilla Wafers in a 9×9-inch pan.
- Add sliced strawberries and spread cream cheese mixture over the strawberries.
- Repeat layering until ingredients are used up, ending with the cream.
- Chill in the refrigerator for at least four hours.
- Top with whipped cream and sliced strawberries before serving.
Last Step:
Please leave a rating and comment letting us know how you liked this recipe! This helps our business to thrive and continue providing free, high-quality recipes for you.Notes
Ensure cream cheese is at room temperature for easy blending.
For a thicker mixture, whip heavy cream until stiffer before adding to the cream cheese.
Experiment with different fruits like blueberries or raspberries for variety.
- Prep Time: 30 minutes
- Cook Time: 0 minutes
- Category: Dessert
- Method: No-Bake
- Cuisine: American
Nutrition
- Calories: 250
- Sugar: 17
- Sodium: 190
- Fat: 15
- Saturated Fat: 8
- Unsaturated Fat: 5
- Trans Fat: 0
- Carbohydrates: 28
- Fiber: 1
- Protein: 3
- Cholesterol: 50