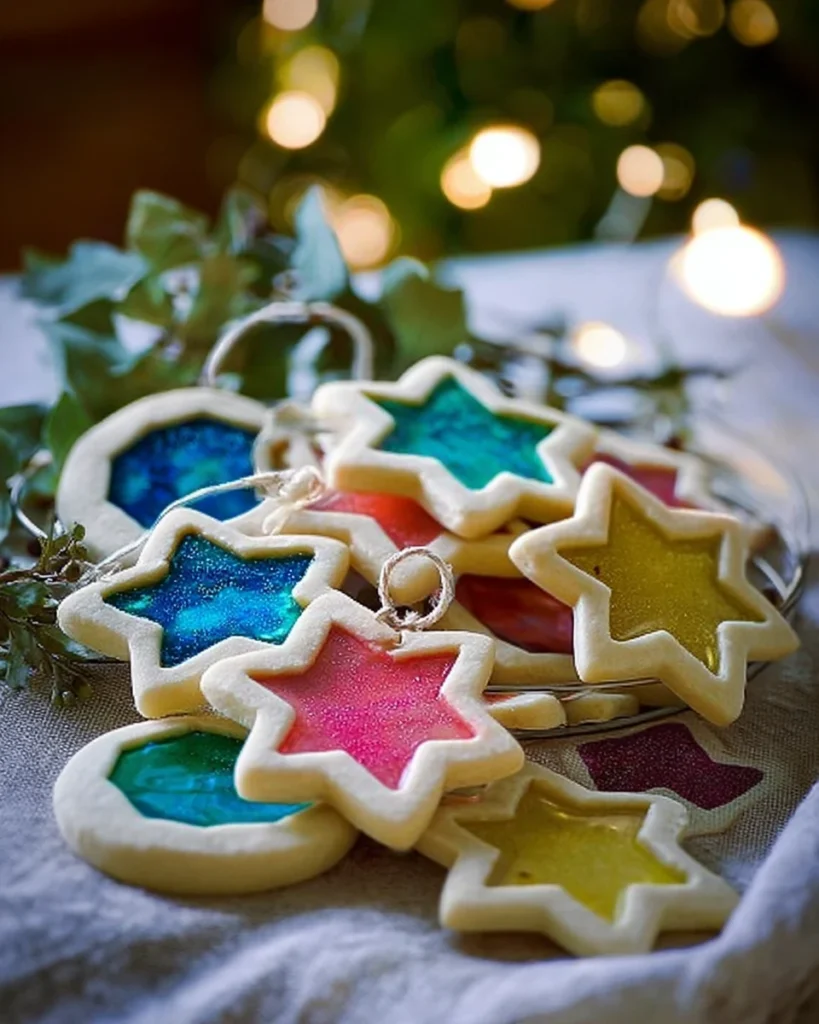
Stained Glass Cookies are a perfect blend of fun and creativity, making them an exciting addition to any holiday celebration. Imagine dazzling treats that not only taste great but also look like colorful windows — it’s like edible art! Whether you’re looking to whip up something special for a festive gathering, or simply want a delightful weekend baking project, these cookies do the trick. The combo of a buttery base and the crunchy, colorful candy center is absolutely irresistible. Plus, they’re really simple to make, so you don’t need to be a seasoned baker to pull them off. Let’s get our aprons on and kick off this delightful baking adventure together!
Why This Recipe Works
Stained Glass Cookies are not just visually stunning; they blend a unique combination of textures and flavors that delight the senses. The use of hard candies creates a beautiful, glass-like window, while the buttery cookie base provides a delicious counterpart. This recipe incorporates simple techniques that ensure anyone can achieve professional-looking results right at home.
Why You’ll Love This Stained Glass Cookies
These cookies are more than just a treat; they are a canvas for creativity and a perfect holiday project for families. Whether you’re giving them as gifts, decorating your tree, or enjoying a festive gathering, their vibrant colors and sweet crunch make them an unforgettable addition to any occasion.

Ingredients for Stained Glass Cookies
- 1 cup unsalted butter (226g), room temperature
- 1 cup granulated sugar (200g)
- 2 eggs
- 4 cups all-purpose flour (480g), sifted
- 1/2 cup cornstarch (65g), sifted
- 3/4 teaspoon kosher salt (3g)
- 1 teaspoon vanilla extract (5mL)
- 1/3 cup hard candies (your choice of color and flavor)
Mixing the Butter and Sugar

Creaming the Butter and Sugar
In a mixing bowl, cream together the softened butter and granulated sugar until the mixture is light and fluffy. This step is crucial for achieving a tender cookie texture. You’ll want to beat them together well, allowing air to get in, which gives the cookies that soft bite.
Adding Eggs and Vanilla
Next, incorporate the eggs one at a time, mixing well after each addition. Then, stir in the vanilla extract, which adds warmth and flavor to your delightful dough.
Combining Dry Ingredients
Whisking the Dry Mixture
In another bowl, sift together the all-purpose flour, cornstarch, and kosher salt. Gradually add this dry mixture to the wet ingredients until just combined. Be careful not to overmix, as this ensures your cookies remain tender and soft.
Chilling the Dough
Forming and Chilling the Dough
Divide the dough into two disks, wrap each in plastic wrap, and chill in the refrigerator for about one hour. This helps to firm up the dough, making it easier to roll and cut shapes later on.
Shaping the Cookies
Rolling Out the Dough
Once the dough has chilled, roll it out on a floured surface or between two sheets of plastic wrap to about 1/4 inch thickness. You’ll want to be careful not to roll it too thin; a bit of thickness will help the cookies hold their shape.
Cutting the Cookie Shapes
Using a medium to large cookie cutter, cut out shapes for your cookies. Then, grab a smaller cookie cutter to cut out the center, creating the “window” for that beautiful stained glass effect.
Preparing for Baking
Adding the Candy
Place your cut-out cookies on a Silpat-lined baking sheet. Take your hard candies, put them in a Ziplock bag, and crush them into small pieces. Fill the window cutouts with the crushed candies, spreading them evenly for a lovely finish.
Baking the Cookies
Baking and Cooling
Now, preheat your oven to 375°F (190°C). Bake the cookies for about 12 minutes, or until the edges turn lightly golden. Allow them to cool on the baking sheet for a few minutes before transferring them to a wire rack to cool completely.
Serving Suggestions
Stained Glass Cookies can be served fresh with hot cocoa or packaged beautifully as gifts for friends and family. They also make for superb decorations on your holiday table or tree.
Tips for Success
- Make sure your butter is at room temperature for optimal creaming.
- Don’t skip the chilling step; it helps with handling and prevents spreading.
- Feel free to experiment with different flavors and colors of hard candies for unique designs.
Variations
These cookies lend themselves to customization. You can add different extracts or zest to the dough. Using seasonal cookie shapes, like stars or hearts, will make them perfect for various events throughout the year.
Storage Tips
Keep those baked cookies in an airtight container at room temperature for about a week. Just be cautious of humidity, as it can affect the candy’s crispness.
Pairing Ideas
For an extra tasty experience, pair Stained Glass Cookies with a nice glass of milk, a warm cup of tea, or even a festive cocktail — there are endless combinations!

FAQs
1. Can I use any type of hard candy?
Absolutely! You can use any hard candy of your choice. Just make sure they’re colorful and flavorful!
2. How do I prevent the cookies from spreading?
Chilling the dough thoroughly before rolling out and cutting shapes, as well as keeping your baking sheets cool, will help avoid spreading.
3. How can I make these cookies gluten-free?
Simply use a gluten-free all-purpose flour blend instead of regular flour.
4. Can I freeze the cookie dough?
Yes, you can freeze the wrapped dough for up to three months. Just remember to thaw it completely in the refrigerator before rolling it out.
5. What if the candy melts too much?
If that happens, let the cookies cool entirely on the baking sheet. This helps the melted candy set back into place.
Stained Glass Cookies are a delightful combination of art and baking, perfect for brightening up your festive gatherings. These charming cookies not only please the palate but also add a touch of color and whimsy to your holiday décor. Each cookie you make is a miniature masterpiece, ready to impress friends and family alike. Enjoy the process of baking and the fun of creating your unique stained glass designs!
Print
Stained Glass Cookies
These Stained Glass Cookies are a festive treat that combines a buttery cookie base with vibrant candy centers, perfect for holiday celebrations or as gifts. Simple to make and visually stunning, they’re an excellent option for both experienced and novice bakers.
- Total Time: 1 hour 12 minutes
- Yield: Approximately 24 cookies 1x
Ingredients
- 1 cup unsalted butter (226g), room temperature
- 1 cup granulated sugar (200g)
- 2 eggs
- 4 cups all-purpose flour (480g), sifted
- 1/2 cup cornstarch (65g), sifted
- 3/4 teaspoon kosher salt (3g)
- 1 teaspoon vanilla extract (5mL)
- 1/3 cup hard candies (your choice of color and flavor)
Instructions
- Cream together softened butter and granulated sugar until light and fluffy.
- Add eggs one at a time, then stir in vanilla extract.
- In a separate bowl, sift together flour, cornstarch, and salt, then gradually add to wet ingredients.
- Divide dough into disks, wrap, and chill for about one hour.
- Roll out dough to 1/4 inch thick and cut out cookie shapes.
- Use a smaller cookie cutter to create window cutouts.
- Place cookies on a baking sheet and fill cutouts with crushed hard candies.
- Bake at 375°F (190°C) for about 12 minutes until edges are lightly golden.
- Cool on the baking sheet for a few minutes before transferring to a wire rack.
Last Step:
Please leave a rating and comment letting us know how you liked this recipe! This helps our business to thrive and continue providing free, high-quality recipes for you.Notes
Ensure butter is at room temperature for easy creaming.
Don’t skip the chilling step to prevent spreading.
Experiment with different colors and flavors of hard candies.
- Prep Time: 1 hour
- Cook Time: 12 minutes
- Category: Dessert
- Method: Baking
- Cuisine: American
Nutrition
- Calories: 150
- Sugar: 9
- Sodium: 70
- Fat: 7
- Saturated Fat: 4.5
- Unsaturated Fat: 2.5
- Trans Fat: 0
- Carbohydrates: 22
- Fiber: 0.5
- Protein: 2
- Cholesterol: 35