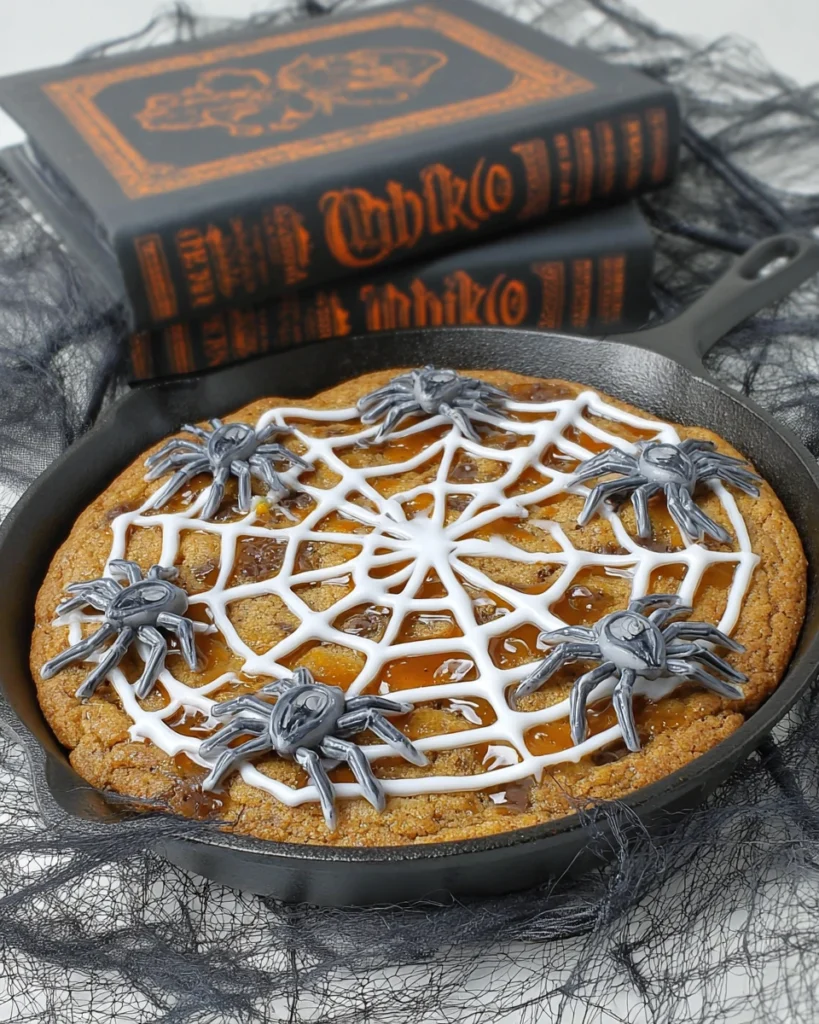
The Spider Web Cookie is a fantastic choice for anyone who wants to treat family and friends to something sweet and festive. These cookies combine chewy oatmeal with rich chocolate and sweet caramel, creating a delightful blend of flavors and textures. But what truly sets them apart is the whimsical spider web design made with frosting. This makes them an exciting treat for Halloween or any gathering where you want to impress your guests. The best part? This recipe is simple and engaging, making it a perfect activity for families or solo bakers looking to have a little fun in the kitchen!
Let’s get started and create these fun treats that everyone will love. In just a few simple steps, you’ll have a delicious batch of Spider Web Cookies. Whether you’re a baking novice or a seasoned pro, this recipe is easy to follow. Grab your ingredients, and let’s make something special together!
Why This Recipe Works
The Spider Web Cookie is a delightful blend of textures and flavors that appeals to both kids and adults. The combination of chewy oatmeal, rich chocolate, and sweet caramel creates a cookie experience that is both unique and immersive. The frosting artistry, resembling a spooky spider web, transforms each cookie into a festive treat perfect for Halloween or any gathering.
Why You’ll Love This Spider Web Cookie
This recipe brings together not only delicious ingredients but also an element of fun! The whimsical design allows for creativity in the kitchen, making it an engaging activity for families, friends, or even solo bakers. And with easy-to-follow instructions, you can impress your guests with stunning homemade treats that taste just as amazing as they look!

Ingredients
- 1 3/4 cups oatmeal
- 1 1/2 cups all-purpose flour
- 1 cup packed brown sugar
- 3/4 tsp baking soda
- 3/4 cup canola oil
- 2 large eggs
- 2 tsp vanilla extract
- 1 cup chocolate chips
- 1/2 cup caramel sauce
- 1/2 cup chocolate sauce
- 1 cup unsalted butter, softened
- 2 cups confectioner’s sugar
- 4 Tbsp heavy whipping cream
- Black gel food coloring
- 2 disposable piping bags
The Prepping Phase

Preheat the Oven and Prepare the Pan
Start by preheating your oven to 350°F (175°C). While that heats up, take an 8-inch round cast iron skillet and spray it with PAM baking spray. This step is essential to ensure your cookies don’t stick to the pan.
Combine Dry Ingredients
Next, grab a standing mixer bowl and add the oatmeal, all-purpose flour, packed brown sugar, baking soda, and a pinch of salt. Mix these together until everything is well combined, creating that signature flavor base.
Add Wet Ingredients
With the mixer set to low speed, drizzle in the canola oil. Then, add the eggs and vanilla extract. Beat it all together until you get a smooth and creamy mixture. It should come together easily.
Incorporate Chocolate Chips
Now it’s time for the chocolate chips! Gently fold them into the dough, making sure they’re evenly distributed. This will give you pockets of chocolate in every bite, and who can resist that?
Bake the Cookies
Pour your cookie dough into the prepared cast iron skillet, spreading it evenly across the bottom. Place it in the oven to bake for about 20-30 minutes. You’ll know it’s done when the top turns a lovely light golden brown. After baking, let the cookies cool completely on a wire rack. This cooling step is crucial to keep the frosting from melting when you add it later.
Drizzle the Sauces
Once cooled, it’s time for the fun part! Generously drizzle both the caramel sauce and chocolate sauce over the top of the cookie. Let those beautiful swirls work their magic and make your cookie extra special.
The Frosting Finesse
Prepare the Frosting
In a clean standing mixer bowl, mix the softened butter, confectioner’s sugar, heavy whipping cream, and 1 teaspoon of vanilla extract. Beat this on high until it becomes well combined and stiff peaks form. This should take about 5 minutes of mixing. You want a nice thick consistency for piping.
Divide and Color the Frosting
Next, divide the frosting into two separate bowls. Add a few drops of black gel food coloring to one bowl and mix until you reach the desired darkness. The other bowl should remain white for that beautiful contrast.
Prepare the Piping Bags
Scoop the black frosting into one disposable piping bag and the white frosting into the other. Cut the tips off both bags to allow for controlled decorating. This simple step will help you create a lovely design!
Create the Spider Web
Using the black frosting, start by piping out an ‘X’ shape on your cookie. This shape will create the foundation for your spider web. Then, pipe a line through the middle to form a star shape. Finally, add half-circles connecting to the lines to complete your web design.
Add the Final Touches
For extra flair, use the white frosting to outline the web, giving it a 3D effect. If you’re feeling creative, pipe a few cute spider decorations using the black frosting on your web. This personal touch will make your cookies truly unique!
Serving Suggestions
These Spider Web Cookies are fantastic for various occasions, whether it’s Halloween parties, school events, or even cozy nights in. Pair them with a glass of milk or a warm cup of cocoa to enhance the cozy vibes. They’re sure to be a hit!
Tips for Success
- Make sure your butter is at room temperature for easy mixing; this will help achieve a smooth frosting.
- When drizzling the sauces, a spoon or squeeze bottle will give you more control over the distribution.
- Allow your cookie to cool completely before frosting for the best results and to prevent melting.
Variations
If you want to mix things up a bit, consider swapping out chocolate chips for peanut butter chips or white chocolate for a unique twist. You can also use different food colors to match various themes beyond Halloween, like orange for fall or red for Valentine’s Day.
Storage Tips
To keep your Spider Web Cookies fresh, store them in an airtight container at room temperature for up to a week. If you want to save them for longer, place them in the freezer for up to three months. Just be sure to separate layers with parchment paper to avoid sticking.

FAQs
1. Can I use quick oats instead of rolled oats?
Yes, you can, but rolled oats are recommended for better texture in the cookie.
2. What can I substitute for canola oil?
Vegetable oil or melted coconut oil work great as alternatives.
3. How can I achieve a sharper contrast in colors with the frosting?
Adding more gel food coloring in small increments will help you reach the desired brightness.
4. Can these cookies be made gluten-free?
Absolutely! Just substitute the all-purpose flour with a gluten-free blend.
5. How do I make the spider decorations?
Pipe two small circles for the body and use smaller circles or lines for the legs with the black frosting, and you’re all set!
These Spider Web Cookies are not just treats; they’re a canvas for creativity and fun! Perfect for baking with family or impressing friends at your next gathering, this recipe holds the promise of joy in every bite. Enjoy the process of baking and savor the delightful taste of your creations!
Print
Spider Web Cookies
Spider Web Cookies offer a fun and festive treat with a delightful mix of chewy oatmeal, chocolate, and caramel. Perfect for Halloween or any celebration, these cookies invite creativity in both design and flavor, making them a great baking project for all skill levels.
- Total Time: 45 minutes
- Yield: 12 cookies 1x
Ingredients
- 1 3/4 cups oatmeal
- 1 1/2 cups all-purpose flour
- 1 cup packed brown sugar
- 3/4 tsp baking soda
- 3/4 cup canola oil
- 2 large eggs
- 2 tsp vanilla extract
- 1 cup chocolate chips
- 1/2 cup caramel sauce
- 1/2 cup chocolate sauce
- 1 cup unsalted butter, softened
- 2 cups confectioner's sugar
- 4 Tbsp heavy whipping cream
- Black gel food coloring
- 2 disposable piping bags
Instructions
- Preheat the oven to 350°F (175°C) and prepare an 8-inch cast iron skillet with baking spray.
- Mix dry ingredients: oatmeal, flour, brown sugar, baking soda, and salt.
- Add canola oil, eggs, and vanilla; mix until smooth.
- Fold in chocolate chips evenly.
- Spread the dough in the skillet and bake for 20-30 minutes until golden brown.
- Cool on a wire rack before drizzling caramel and chocolate sauce on top.
- Prepare the frosting using butter, confectioner's sugar, heavy cream, and vanilla; mix until thick.
- Divide frosting, add black gel coloring to one bowl, and pipe designs on cooled cookies.
Last Step:
Please leave a rating and comment letting us know how you liked this recipe! This helps our business to thrive and continue providing free, high-quality recipes for you.Notes
Ensure butter is at room temperature for easy mixing.
Use a squeeze bottle for precise sauce distribution.
Cool cookies completely before adding frosting to avoid melting.
- Prep Time: 15 minutes
- Cook Time: 30 minutes
- Category: Dessert
- Method: Baking
- Cuisine: American
Nutrition
- Calories: 220
- Sugar: 15
- Sodium: 150
- Fat: 10
- Saturated Fat: 2.5
- Unsaturated Fat: 7.5
- Trans Fat: 0
- Carbohydrates: 30
- Fiber: 1
- Protein: 3
- Cholesterol: 35