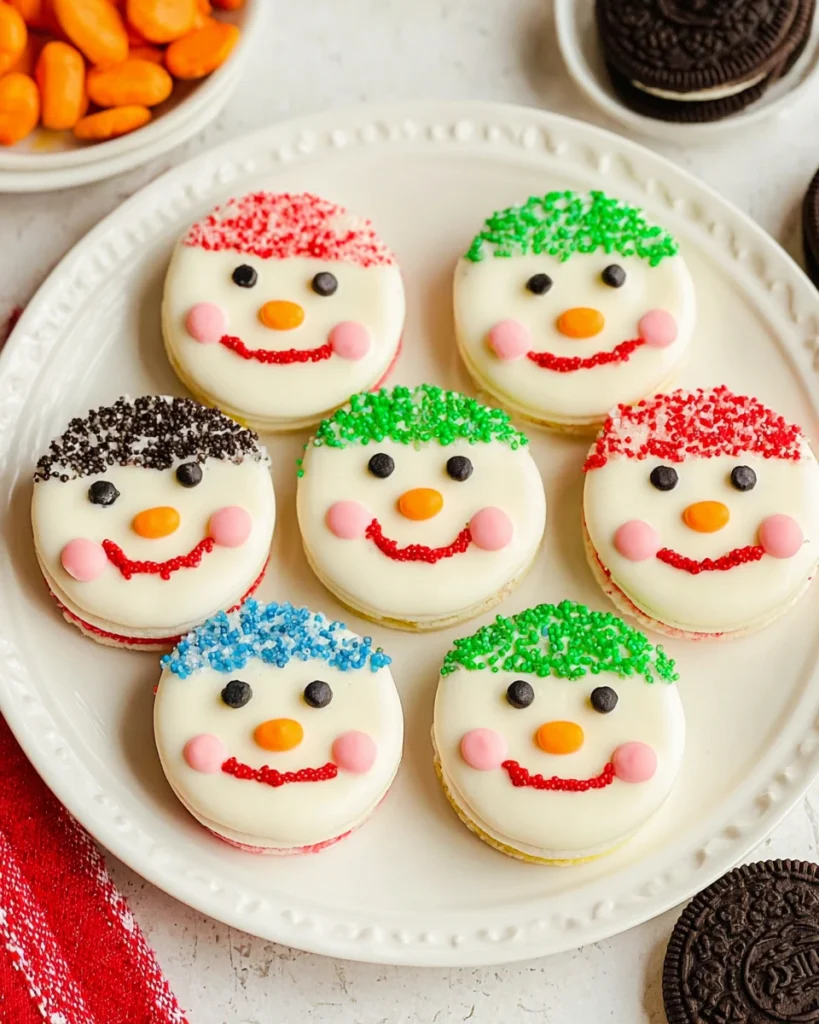
No Bake Oreo Snowman Cookies are the perfect festive treat to add some fun to your holiday season. Imagine taking a classic Oreo, giving it a snowy twist, and transforming it into an adorable little snowman—sounds like a cheerful way to spend an afternoon, right? Without any baking involved, this recipe makes it easy for anyone to join in the holiday fun, no matter their skill level in the kitchen. In fact, it’s an engaging activity that invites your family, especially the kids, to get creative and make their own delicious snowman designs. Whether you’re prepping for a holiday gathering or simply want to share some joy with friends, these cookies are sure to bring smiles all around. So, let’s roll up our sleeves and get started on crafting these delightful No Bake Oreo Snowman Cookies!
Why This Recipe Works
This recipe shines for several reasons. Firstly, it brilliantly combines the classic taste of Oreos with fun decorations, making every cookie a unique creation. You’ll enjoy the crunch of the golden Oreos paired with the sweetness of the white chocolate. Secondly, since there’s no baking required, it’s incredibly quick and effortless, perfect for everyone—from skilled bakers to kitchen novices. Lastly, the activity of decorating cookies serves as a wonderful way for family members, especially kids, to bond and share in joyous moments. Crafting these snowmen is not just about making a treat; it’s about creating memories that last a lifetime.
Why You’ll Love This No Bake Oreo Snowman Cookies
You’ll absolutely love these cookies for their sheer adaptability. They’re perfect for any holiday gathering, from cozy family get-togethers to larger festive celebrations. Plus, their customizable nature allows you to switch up decorations based on your own tastes or what you have on hand. Whether you want a traditional snowman look or something bleaker, feel free to express your creativity. Making these cookies isn’t just about enjoying a sweet treat; it’s also about the fun of creating something special with your loved ones. Each bite brings sheer joy and sweet nostalgia!

Ingredients
To create your No Bake Oreo Snowman Cookies, you’ll need the following ingredients:
- 2 (10oz) packages Ghirardelli white melting wafers
- 24 double-stuffed golden Oreos
- 168 black sugar pearl sprinkles (7 per snowman)
- 24 orange Tic Tacs
- 12 sour punch straws (cut in half)
- 48 milk chocolate M&Ms
How to Make No Bake Oreo Snowman Cookies

Prepare Your Baking Sheets and Melt Chocolate
To kick things off, start by lining two baking sheets with parchment paper. This will ensure easy removal later. Next, melt the Ghirardelli white melting wafers. You can do this using a double boiler, or if you’re short on time, a microwave works just as well. If you go the microwave route, heat the wafers in short bursts, stirring in between until they’re smooth and ready to dip.
Dip the Oreos in Chocolate
Now, grab your golden Oreos. Place one on a fork—this will make dipping a breeze. Next, dip the Oreo into the melted white chocolate, fully immersing it for that perfect snowy look. Then, gently tap the fork on the rim of the bowl to remove any excess chocolate. Carefully place the dipped Oreo onto your parchment-lined baking sheet, and repeat this step until all Oreos are coated.
Decorate Your Snowman Faces
While the chocolate is still soft and gooey, it’s time to have some fun decorating! Start by adding two black sugar pearls for the eyes. Then, take an orange Tic Tac and place it in the center for the nose. For the mouth, use 4-5 more sugar pearls to create a charming smile. Each addition adds character to your adorable snowman!
Add the Ear Muffs
Next, let’s add some winter flair! Take a sour punch straw and cut it in half. Insert a piece onto the top of an Oreo to create ear muffs. Make sure you hold it in place for a few seconds to let the chocolate begin to set, securing it firmly on top.
Attach M&M Straps
For an extra touch of cuteness, place one milk chocolate M&M on each side of the sour punch straw. This helps to create the look of straps holding the “ear muffs” in place. It’s these little details that really bring your snowmen to life!
Complete and Chill
Continue the process with all your Oreos, experimenting with different colors of sour punch straws and M&Ms to create a vibrant display. Once you’ve finished decorating everyone, pop the baking sheets into the fridge. Let them chill for about 10-15 minutes, or until the chocolate is fully set and firm.
Serving Suggestions
When it comes time to serve your delightful No Bake Oreo Snowman Cookies, consider pairing them with a warm cup of hot cocoa, which makes for a cozy treat on chilly winter evenings. You could also display these festive cookies alongside other holiday desserts to create an eye-catching dessert platter. They not only taste great but also look joyous on any holiday table!
Tips for Success
To achieve the best results, ensure that the melted chocolate is at the proper temperature for a smooth dip. If it’s too hot or cooled too much, it might clump. Also, don’t hesitate to experiment with beloved candies for unique decor. There are no rules here—have fun with it!
Variations
For a twist, you can use regular Oreos instead of golden ones. This will introduce a different flavor to your cookies. Additionally, consider adding edible glitter for a sparkling effect, making your snowmen look even more festive!
Storage Tips
After all that hard work, make sure to store any leftover cookies properly in an airtight container in the refrigerator. They should last about a week. Just a quick tip—avoid stacking the cookies on top of each other to prevent them from sticking together.

FAQs
1. Can I use dark chocolate instead of white chocolate?
Absolutely, using dark chocolate will provide a deliciously different flavor profile that’s just as tasty.
2. How long do these cookies last?
These sweet treats can be safely stored in an airtight container in the refrigerator for about a week.
3. Can I make these ahead of time?
Definitely! In fact, making these cookies a few days in advance is a fantastic way to relieve some holiday stress.
4. What can I use if I don’t have sugar pearls?
No worries! Chocolate chips or colorful sprinkles can easily substitute for sugar pearls for the eyes.
5. Are these cookies safe for kids with allergies?
Be sure to check ingredient labels for potential allergens, particularly in chocolate and candies, before serving.
These delightful No Bake Oreo Snowman Cookies will undoubtedly add joy to your holiday celebrations while also providing a fun activity for families. Embrace the cheer, personalize them with your favorite candies, and enjoy this easy no-bake recipe that helps to create sweet memories together!
Print
No Bake Oreo Snowman Cookies
These No Bake Oreo Snowman Cookies are an easy and fun holiday treat that combines crunchy Oreos and sweet decorations. They invite creativity and joy for all ages!
- Total Time: 20 minutes
- Yield: 24 cookies 1x
Ingredients
- 2 (10oz) packages Ghirardelli white melting wafers
- 24 double-stuffed golden Oreos
- 168 black sugar pearl sprinkles (7 per snowman)
- 24 orange Tic Tacs
- 12 sour punch straws (cut in half)
- 48 milk chocolate M&Ms
Instructions
- Line two baking sheets with parchment paper.
- Melt the Ghirardelli white melting wafers using a double boiler or microwave.
- Dip each Oreo in the melted white chocolate and place on the baking sheet.
- Decorate with black sugar pearls for eyes, an orange Tic Tac for the nose, and sugar pearls for a smile.
- Add half a sour punch straw on top for ear muffs, securing with M&Ms.
- Chill in the fridge for 10-15 minutes until chocolate is set.
Last Step:
Please leave a rating and comment letting us know how you liked this recipe! This helps our business to thrive and continue providing free, high-quality recipes for you.Notes
Melt chocolate at the proper temperature for best coating.
Feel free to experiment with different candies for decoration.
Store leftovers in an airtight container in the refrigerator for up to a week.
- Prep Time: 20 minutes
- Cook Time: 0 minutes
- Category: Dessert
- Method: No Bake
- Cuisine: American
Nutrition
- Calories: 150
- Sugar: 12g
- Sodium: 50mg
- Fat: 7g
- Saturated Fat: 4g
- Unsaturated Fat: 2g
- Trans Fat: 0g
- Carbohydrates: 21g
- Fiber: 0g
- Protein: 1g
- Cholesterol: 5mg