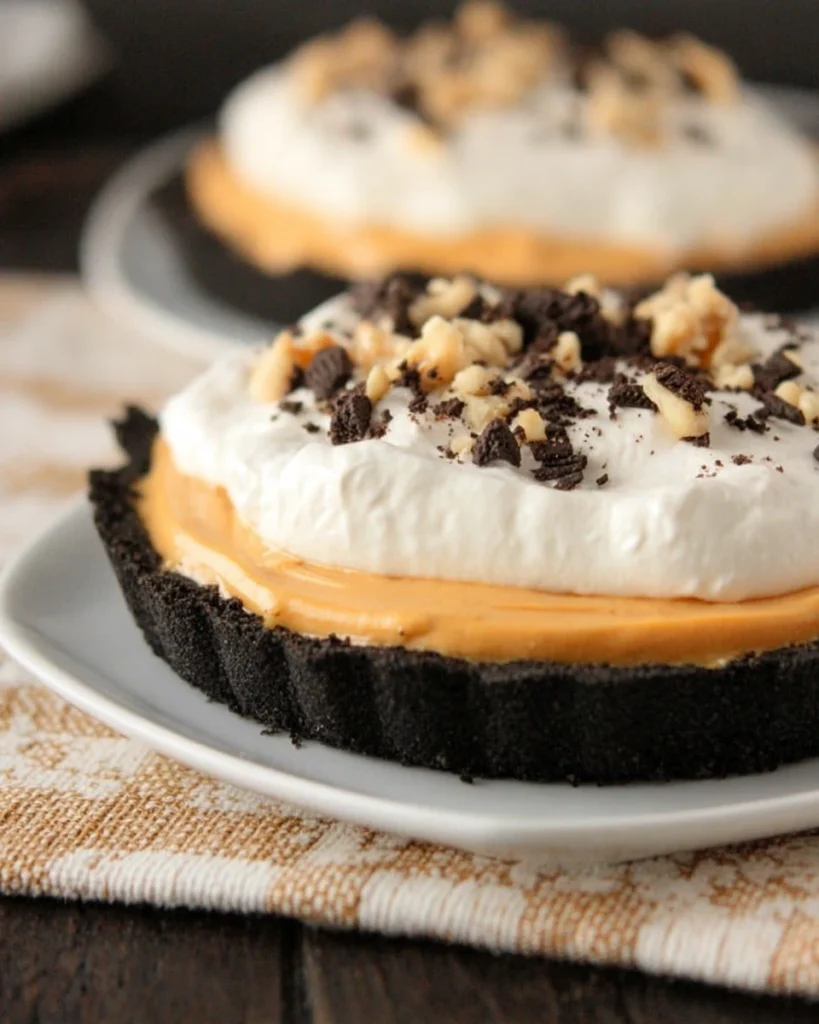
Creating the perfect dessert comes down to a little bit of creativity and some key ingredients. If you’re searching for an easy but impressive dessert, the No Bake Oreo Pumpkin Pie is just the ticket! It’s the kind of pie that invites you to gather around the table, share stories, and make memories. Picture this: a crunchy Oreo crust filled with a creamy, spiced pumpkin filling that dances on your palate with every bite. There’s no baking required, which means you can whip it up quickly without any fuss.
Whether it’s for Thanksgiving, a cozy evening at home, or a potluck dinner with friends, this pie screams of comfort and joy. Plus, it appeals to everyone—whether you’re a pumpkin pie aficionado or simply someone who loves Oreos. Let’s explore how to bring this scrumptious dessert to life with a balance of flavors and textures that truly shines.
Why This Recipe Works
Creating the perfect dessert demands a thoughtful balance of flavors and textures. The No Bake Oreo Pumpkin Pie combines rich cream cheese and warm pumpkin spices for a comforting taste, perfectly complemented by the crunchy Oreo crust. This recipe requires no oven time, maintaining the fresh flavors and ensuring ease of preparation. It’s the ideal treat when you want a delicious offering without the hassle of baking.
Why You’ll Love This No Bake Oreo Pumpkin Pie
Packed with deliciousness, this pie is not only a breeze to make but also an instant crowd-pleaser. The iconic Oreo cookies harmonize beautifully with the creamy pumpkin filling, while the fluffy whipped topping adds a lightness that makes each bite irresistible. Whether for a holiday gathering or a cozy night in, this pie fits every occasion!

Ingredients
- 16 Original Oreo Cookies
- 4 tablespoons unsalted butter, melted
- 8 ounces cream cheese, softened at room temperature
- 3/4 cup pumpkin puree
- 1/2 cup granulated sugar
- 1/2 teaspoon vanilla extract
- 1/4 teaspoon ground cinnamon
- 1/8 teaspoon ground nutmeg
- 1/2 cup heavy cream
- 3 tablespoons sugar (for whipped cream)
- 1/4 teaspoon vanilla extract (for whipped cream)
- 4 tablespoons chopped, toasted walnuts for garnish (optional)
Preparing the Oreo Crust

Crush the Oreo Cookies
Start by grabbing a food processor to pulse the Oreo cookies until finely ground. This step is crucial as it forms the rich and flavorful base for your pie, giving the crust a deliciously chocolatey kick.
Combine with Melted Butter
Next, pour the melted butter into the crushed Oreos and pulse again to mix everything thoroughly. The butter binds the crust, making it easier to shape and ensuring it holds together nicely.
Press into Tart Pans
Now, spoon the Oreo mixture into individual 4-inch tart pans. Firmly press it down and up the sides to create a beautiful, uniform crust. After that, chill these pans in the refrigerator while you prepare the filling.
Making the Creamy Pumpkin Filling
Whip the Cream Cheese
In a spacious mixing bowl, whip the softened cream cheese until it’s nice and smooth. This forms the creamy foundation for your pie, ensuring a luscious texture that pairs perfectly with the pumpkin.
Add Pumpkin and Spices
Stir in the pumpkin puree along with granulated sugar, vanilla extract, ground cinnamon, and ground nutmeg. Mix everything well until fully combined. You’ll notice how the warm spices capture the essence of fall and make your kitchen smell heavenly.
Blend Until Smooth
Whip the filling mixture at high speed for one minute. Scrape down the sides of the bowl, and mix for another 15 seconds or until the mixture is smooth and well-blended. You’re creating pure magic here!
Fill the Crust
Now it’s time to bring it all together. Divide the creamy pumpkin filling evenly among the chilled tart crusts. Smooth the tops with a spatula, ensuring each tart gets an even layer of that delightful pumpkin goodness.
Topping your No Bake Pumpkin Pie
Prepare the Whipped Cream
In a separate bowl, whip the heavy cream with the sugar and vanilla extract until stiff peaks form. This delightful topping adds a fluffy, airy lightness to your pie that everyone will love.
Spread Over the Filling
Evenly divide the whipped cream among the tart pans, gently spreading it over the pumpkin filling. This creamy layer will elevate the pie’s texture and make it even more inviting.
Garnish and Chill
Sprinkle the top with chopped, toasted walnuts for an added crunch and flavor boost. Finally, store your creations in the refrigerator until you’re ready to serve.
Serving Suggestions
Your No Bake Oreo Pumpkin Pie is perfect for holiday dinners, casual family gatherings, or parties. Serve it chilled for the best taste! For an extra touch of sweetness, consider offering a side of caramel sauce or chocolate drizzle.
Tips for Success
- Make sure the cream cheese is at room temperature to achieve a smooth filling without lumps.
- Chill the crust long enough to hold its shape when filled; about 30 minutes should do the trick.
- Whip the cream until stiff peaks form for best results in the topping; this ensures it holds nicely on the pie.
Variations
Feel free to experiment with different flavor profiles. You can substitute the pumpkin with sweet potato or even butternut squash puree for a unique twist. Mixing in finely chopped chocolate can also create a richer experience, but be careful not to overpower the pumpkin flavor.
Storage Tips
Store any leftovers tightly covered in the refrigerator for up to 3 days. While the pie is best enjoyed fresh, it can still be appreciated slightly chilled over the next few days.
Pairing Ideas
To enhance your tasting experience, pair your No Bake Oreo Pumpkin Pie with a dollop of vanilla ice cream or a steaming cup of spiced apple cider. These combinations offer a taste of autumn bliss that you won’t soon forget!

FAQs
1. Can I make this pie in advance?
Absolutely! This pie can be made up to two days in advance and stored in the refrigerator, making it a great option for busy holiday schedules.
2. Is there an alternative for the heavy cream?
Yes, you can substitute the heavy cream with whipped topping or coconut cream for a dairy-free option that still tastes fabulous.
3. How do I serve this pie?
Slice into wedges and serve chilled. A garnish of whipped cream and walnuts makes it visually appealing and even more tempting!
4. Can I freeze the No Bake Oreo Pumpkin Pie?
While it’s best served fresh, you can freeze individual portions. Just make sure to thaw them in the refrigerator before serving.
5. What is pumpkin puree?
Pumpkin puree is made from cooked and pureed pumpkin, typically found in cans at grocery stores. Always choose pure pumpkin and not pumpkin pie filling for the best results in this recipe.
Indulge in the delightful blend of creamy and crunchy with the No Bake Oreo Pumpkin Pie. Each bite is a celebration of seasonal flavors, perfect for satisfying your sweet cravings or impressing your guests. Enjoy this easy-to-make dessert that’s bursting with festive spirit, while leaving a lasting impression at your next gathering!
Print
No Bake Oreo Pumpkin Pie
This No Bake Oreo Pumpkin Pie offers a delightful blend of crunchy and creamy textures. It’s an easy dessert perfect for any occasion, featuring pumpkin and Oreo flavors.
- Total Time: 20 minutes
- Yield: 4 individual tarts 1x
Ingredients
- 16 Original Oreo Cookies
- 4 tablespoons unsalted butter, melted
- 8 ounces cream cheese, softened at room temperature
- 3/4 cup pumpkin puree
- 1/2 cup granulated sugar
- 1/2 teaspoon vanilla extract
- 1/4 teaspoon ground cinnamon
- 1/8 teaspoon ground nutmeg
- 1/2 cup heavy cream
- 3 tablespoons sugar (for whipped cream)
- 1/4 teaspoon vanilla extract (for whipped cream)
- 4 tablespoons chopped, toasted walnuts for garnish (optional)
Instructions
- Crush the Oreo cookies in a food processor until finely ground.
- Mix the crushed Oreos with melted butter and pulse to combine.
- Press the mixture firmly into individual tart pans and chill in the refrigerator.
- Whip the cream cheese until smooth in a mixing bowl.
- Add pumpkin puree, sugar, vanilla extract, cinnamon, and nutmeg; mix until well combined.
- Blend the mixture at high speed until smooth.
- Divide the filling among the chilled crusts and smooth the tops with a spatula.
- Whip heavy cream with sugar and vanilla until stiff peaks form.
- Spread whipped cream over the filling in tart pans.
- Garnish with chopped walnuts and refrigerate until ready to serve.
Last Step:
Please leave a rating and comment letting us know how you liked this recipe! This helps our business to thrive and continue providing free, high-quality recipes for you.Notes
Ensure the cream cheese is at room temperature for a smooth filling.
Chill the crust for at least 30 minutes to hold its shape.
Whip the cream until stiff peaks form for optimal topping consistency.
- Prep Time: 20 minutes
- Cook Time: 0 minutes
- Category: Dessert
- Method: No Bake
- Cuisine: American
Nutrition
- Calories: 350
- Sugar: 18
- Sodium: 220
- Fat: 22
- Saturated Fat: 12
- Unsaturated Fat: 9
- Trans Fat: 0
- Carbohydrates: 30
- Fiber: 2
- Protein: 5
- Cholesterol: 60