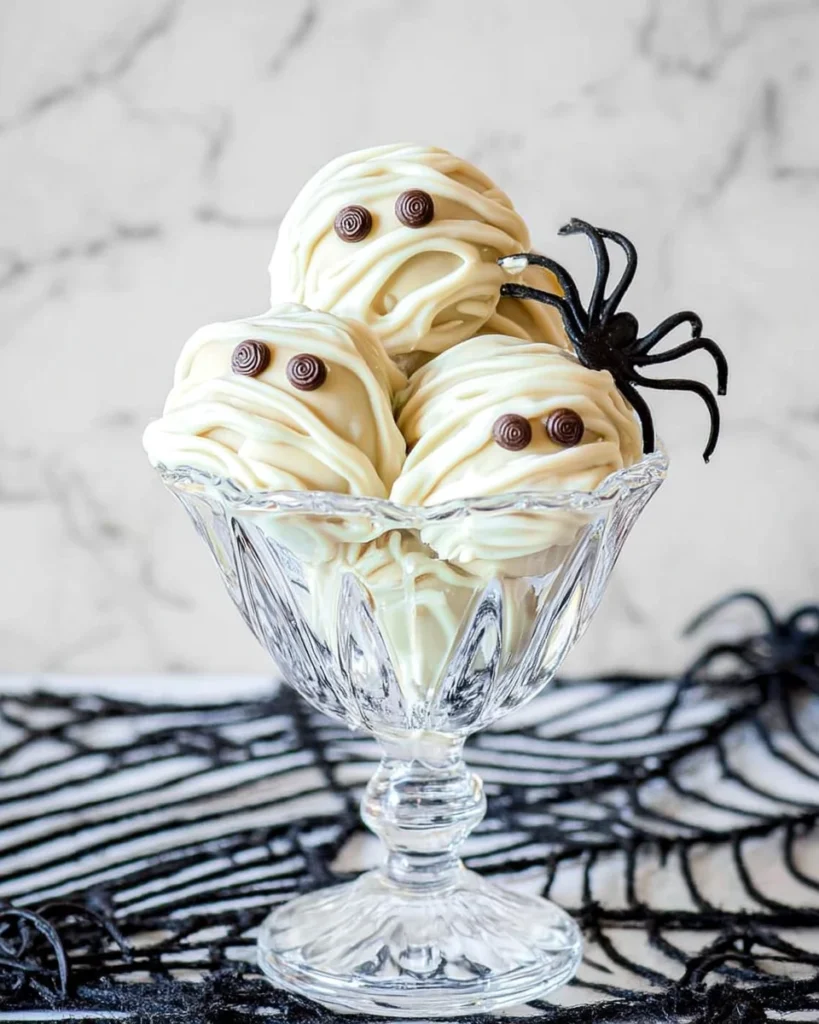
Mummy Oreo Truffles are the perfect spooky treat for Halloween! These delightful little bites are not only easy to make but are also incredibly fun to decorate. Imagine creamy, chocolatey goodness wrapped in a soft, white chocolate coat, topped with candy eyes—an adorable treat that will wow your friends and family. As you prepare for Halloween festivities, why not make a batch of these cute truffles? They’re sure to be a conversation starter and a hit at any gathering. The best part? You don’t need to be a master chef to whip these up! With just a few simple ingredients and steps, you’ll discover a creative way to enjoy cookies and cream in a whole new form. So grab your aprons, and let’s get started on making these memorable Mummy Oreo Truffles!
Why This Recipe Works
Mummy Oreo Truffles combine the rich flavors of crushed Oreo cookies with cream cheese, resulting in a delightful chocolatey interior that is perfectly balanced. The white chocolate coating offers a smooth finish that hardens to encase the truffles, while the drizzle adds a whimsical mummy-like touch, making them perfect for Halloween festivities.
Why You’ll Love This Mummy Oreo Truffles
These Mummy Oreo Truffles are not just a treat for the taste buds; they also bring a dash of creativity to your dessert table. With minimal ingredients and simple preparation steps, you’ll find that making these spooky snacks can be just as enjoyable as eating them. They’re perfect for kids’ parties, Halloween gatherings, or as festive treats to share with family and friends.

Ingredients
- 1 package Oreo cookies
- 8 ounces cream cheese, softened
- 1 teaspoon vanilla extract
- ¼ teaspoon salt
- 24 ounces (2 bags) white chocolate chips
- 2 tablespoons vegetable oil
- Candy eyes
How to Make Mummy Oreo Truffles

Prepare Your Workstation
Begin by preparing a cookie sheet with foil or parchment paper. This will prevent the truffles from sticking and make cleanup easier. Setting up your space ahead of time also helps keep things organized, making the process smoother.
Crush the Oreos
In a food processor or high-powered blender, pulse the Oreo cookies until they are finely crushed into crumbs. This crumbly mixture will form the base of your truffles. Make sure not to leave any large chunks, as a finer consistency ensures that the texture is just right.
Combine Ingredients
Add the softened cream cheese, vanilla extract, and salt to the cookie crumbs in the food processor. Pulse the mixture until it is well moistened and combined, ensuring a smooth texture. Working quickly helps keep the mixture creamy without getting too warm.
Form the Truffles
Using a large melon baller, small cookie dough scoop, or measuring spoon, scoop out about a tablespoon of the Oreo mixture at a time. Roll the mixture into a ball with your hands. This step can be messy, but it’s all part of the fun! Repeat this process, placing the balls about 2 inches apart on the prepared cookie sheet.
Chill the Truffles
Pop the formed Oreo balls into the refrigerator and chill for about 30 minutes. If you’re in a hurry, you can freeze them for 15-20 minutes instead. This cooling time helps the truffles firm up, making them easier to coat later.
Melt the White Chocolate
In a microwave-safe bowl, melt the white chocolate chips. Start with 30 seconds in the microwave, stir, then continue microwaving in 10-15 second intervals, stirring in between until fully melted and smooth. Be cautious—chocolate can burn easily, so keep an eye on it!
Add Vegetable Oil
Stir in the vegetable oil into the melted white chocolate until the texture is creamy and consistent. This will help make the coating glossy and easier to work with. A little oil goes a long way in achieving that perfect finish.
Coat the Oreo Balls
As quickly as possible, dip each chilled Oreo ball into the white chocolate coating. Use a fork to lift the truffles out, allowing excess chocolate to drip back into the bowl. Place the coated balls back on the baking sheet. This step is where the magic happens—watch them transform into cute little mummies!
Decorate with Candy Eyes
Before the chocolate hardens, place two candy eyes on top of each truffle. This adds that spooky character, bringing your creations to life! They’ll look adorable just in time for your Halloween celebrations.
Create the Mummy Bandages
Pour any leftover white chocolate into a zip-lock bag, seal it, and snip off a tiny corner. Pipe the white chocolate over the truffles to create a mummy-like bandage effect. Get creative with your designs—each truffle can be unique!
Allow to Harden
Let the finished Mummy Oreo Truffles sit at room temperature for about 30 minutes to harden. Alternatively, they can be placed in the freezer for around 15 minutes to speed up the process. Enjoy the anticipation as you wait for your spooky treats to set!
Serving Suggestions
Serve Mummy Oreo Truffles on a festive platter at Halloween parties, alongside other seasonal treats. Pair them with warm drinks like cider or cocoa for a cozy vibe. The contrast of flavors gives everyone a reason to enjoy them even more!
Tips for Success
- Ensure the cream cheese is softened for easier mixing. This will help avoid clumps and make blending smooth.
- Use high-quality white chocolate for a smooth finish. Taste matters, and good chocolate elevates your truffles.
- Experiment with different types of drizzle for added flair. You can even try colored chocolate for extra fun!
Variations
- Try substituting the Oreo cookies with other flavored cookies like peanut butter or mint for a unique spin. Each new flavor brings its charm.
- Add sprinkles or colored sugar for an extra festive touch. This small step can make your truffles stand out even more!
Storage Tips
Keep any leftover Mummy Oreo Truffles in an airtight container in the refrigerator for up to one week. You can also freeze them for later enjoyment. Just ensure they are well-wrapped to prevent freezer burn; nobody wants a stale truffle!
Pairing Ideas
These truffles pair wonderfully with coffee, hot chocolate, or even a glass of milk. They also make a perfect addition to a dessert platter alongside cookies or brownies. Mix and match to discover delightful combinations!

FAQs
1. Can I use different types of chocolate?
Yes, you can substitute white chocolate with dark or milk chocolate for different flavor profiles! Each type brings a unique sweetness.
2. How long can the Mummy Oreo Truffles be stored?
They can be stored in the refrigerator for up to one week or in the freezer for up to three months, making them an easy make-ahead treat.
3. Are there any allergen concerns?
Please check the packaging of the Oreo cookies and white chocolate for any potential allergens. It’s always better to be safe!
4. Can I make these truffles gluten-free?
Yes, use gluten-free Oreo cookies to make these truffles suitable for those with gluten sensitivities. Everyone deserves a treat!
5. What’s the best way to melt chocolate?
Microwaving in short intervals while stirring in between is the best method to prevent overheating and seizing. Chocolate should melt slowly for the best consistency.
Mummy Oreo Truffles are a delightful way to celebrate Halloween with a fun twist on a classic treat. Their combination of flavors and creative presentation makes them a showstopper at any gathering. With easy-to-follow steps and the ability to customize them, you’ll find that these truffles are not only a joy to create but also a guaranteed crowd-pleaser. Whether you’re serving them to trick-or-treaters or enjoying them at a spooky movie night, they are sure to bring smiles all around!
Print
Mummy Oreo Truffles
These Mummy Oreo Truffles blend crushed Oreos with cream cheese, enveloped in white chocolate and topped with candy eyes, making them a fun Halloween treat.
- Total Time: 1 hour
- Yield: 24 truffles 1x
Ingredients
- 1 package Oreo cookies
- 8 ounces cream cheese, softened
- 1 teaspoon vanilla extract
- ¼ teaspoon salt
- 24 ounces (2 bags) white chocolate chips
- 2 tablespoons vegetable oil
- Candy eyes
Instructions
- Prepare a cookie sheet with foil or parchment paper.
- In a food processor, pulse the Oreo cookies until finely crushed.
- Add cream cheese, vanilla extract, and salt to the cookie crumbs and pulse until combined.
- Scoop tablespoon-sized portions of the mixture and roll into balls.
- Chill the formed truffles in the refrigerator for 30 minutes.
- Melt white chocolate chips in a microwave-safe bowl, adding vegetable oil.
- Dip each chilled Oreo ball into the melted white chocolate.
- Place candy eyes on top of each truffle.
- Pipe extra white chocolate over the truffles for a mummy bandage effect.
- Let them sit for 30 minutes to harden.
Last Step:
Please leave a rating and comment letting us know how you liked this recipe! This helps our business to thrive and continue providing free, high-quality recipes for you.Notes
Ensure cream cheese is softened for easier mixing.
Use high-quality white chocolate for better flavor and texture.
Experiment with chocolate drizzles for creative presentations.
- Prep Time: 30 minutes
- Cook Time: 30 minutes
- Category: Dessert
- Method: No-Bake
- Cuisine: American
Nutrition
- Calories: 150
- Sugar: 10
- Sodium: 90
- Fat: 9
- Saturated Fat: 5
- Unsaturated Fat: 3
- Trans Fat: 0
- Carbohydrates: 18
- Fiber: 1
- Protein: 2
- Cholesterol: 10