Mini Pumpkin Pies (Small Batch) are a delightful way to embrace the flavors of fall without going overboard. Perfect for cozy gatherings or simply satisfying a sweet craving, these small treats offer all the classic flavors of pumpkin pie, minus the fuss. You might fall in love with the buttery crust and creamy filling that burst with spice. Plus, this recipe is so simple, it feels like you’re making memories in the kitchen rather than just following a recipe. As the scent of cinnamon fills the air, you’ll be reminded of autumn’s warmth and the joy of baking. Ready to impress your friends and family with these charming little pies? Let’s jump right into the fun of making Mini Pumpkin Pies (Small Batch)!
Why This Recipe Works
This recipe for Mini Pumpkin Pies (Small Batch) succeeds beautifully by combining a flaky, buttery crust with a rich filling. You’ll capture the essence of traditional pumpkin pie while simplifying things for smaller gatherings. The magic happens when you bake them in a muffin pan, which provides the perfect texture and portion size. No need to worry about excess leftovers, as everyone gets a delightful treat tailored just for them.
Why You’ll Love This Mini Pumpkin Pies (Small Batch)
These mini pumpkin pies are not only adorable; they are bursting with flavor that shines during the holiday season. Whether it’s a warm family dinner or a friendly get-together, these cute bites make for the ideal treat. Their small size helps satisfy those pumpkin cravings without guilt. And let’s not forget the cinnamon whipped cream that elevates them to new heights, making every bite feel like a special moment.
 5")
Ingredients for Mini Pumpkin Pies (Small Batch)
- 1 (9-inch) pie crust (125 grams), homemade or store-bought
- ½ cup pumpkin puree (125 grams)
- ¼ cup condensed milk
- ¼ cup brown sugar
- 1 teaspoon pumpkin spice blend
- ¼ teaspoon salt
- 1 egg
- Whipped cream (optional, for topping)
Preparing the Filling
 6")
Whisk Together the Ingredients
Start by grabbing a large mixing bowl. Add the pumpkin puree, condensed milk, brown sugar, pumpkin spice blend, and salt. Using a whisk, blend everything together until it’s smooth and well combined. Then, toss in the egg and mix again until you have a luscious filling ready to go. This step is crucial as it sets the foundation for the deliciousness to come.
Making the Crust
Roll Out and Cut the Dough
Next, roll out the pie dough into a large circle that’s about ⅛-inch thick. Using a 3.5-inch round cookie cutter, cut out 9 circles. It’s okay to set aside any scraps; they can always be used later for a cute touch on top of your pies.
Assembling the Mini Pies
Fit the Dough into Muffin Pan
Now comes the fun part! Carefully press each dough circle into the cavities of a standard 12-cup muffin pan. Be gentle—make sure not to stretch the dough too thin. Each should cover about half the height of each cavity, ensuring a nice base for the filling.
Fill the Crusts
Spoon about 1.5 tablespoons of the pumpkin filling into each pie crust. Make sure to fill them about three-quarters full to give them enough room to rise without spilling over. If you have leftover dough scraps, why not cut them into fun shapes? Place them on top for a charming decorative touch.
Baking the Mini Pies
Bake for Perfection
With your muffin pan now filled and prepped, transfer it to a preheated oven at 375°F. Bake for about 20 minutes, or until the crust turns a lovely golden hue and the filling sets. The aroma wafting through your kitchen will be absolutely heavenly!
Let Cool Gradually
Once baked, carefully remove the muffin pan from the oven. Allow those mini pumpkin pies to cool at room temperature for at least 20 minutes. For the best results and to prevent cracking, it’s helpful to turn off the oven and leave the pies in there for an additional 30 minutes.
Serving Suggestions
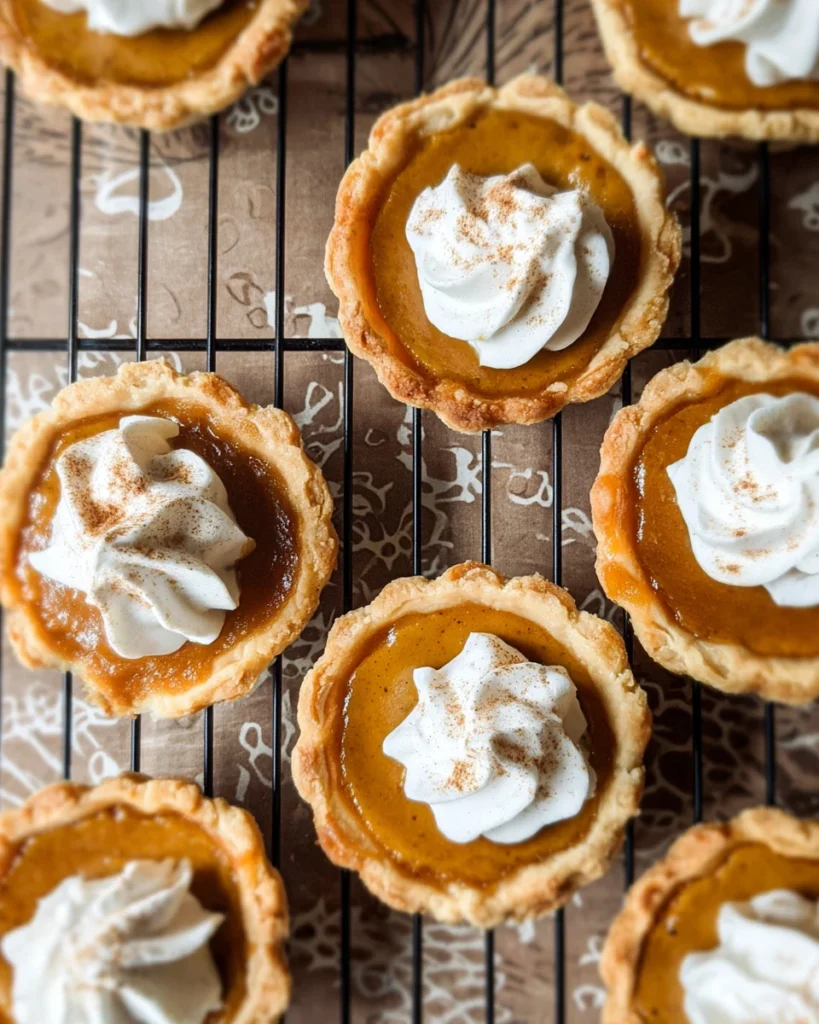
These mini pumpkin pies can be served warm or cold, depending on your preference. Top them off with a dollop of whipped cream and a sprinkle of pumpkin spice blend or cinnamon to seal the deal. It’s all about that extra touch to make your dessert shine!
Tips for Success
- Make sure your pumpkin filling is whisked well for that perfect texture.
- Keep an eye on the baking time; every oven can be a little different, so adjust if needed.
- If you want to add a refreshingly cool element, consider chilling the whipped cream before serving.
Variations
If you’re feeling adventurous, you can switch things up! For example, try substituting the pumpkin puree with butternut squash for a slightly different flavor profile. You could also experiment with different spices, like nutmeg or allspice, for a unique twist on the classic taste.
Storage Tips
Got leftovers? No worries! You can store any uneaten mini pumpkin pies in an airtight container in the refrigerator for up to 3 days. When you’re ready to enjoy again, reheat gently in the oven or savor them cold.
Pairing Ideas
Think about enjoying these charming mini pumpkin pies alongside warm apple cider or a strong coffee. These pairings will truly enhance the cozy autumn ambience at your table.
 7")
FAQs
1. Can I use fresh pumpkin instead of canned?
Yes, absolutely! Just remember to ensure it’s well-cooked and pureed to a smooth consistency.
2. Can I prepare the filling in advance?
Of course! You can make the filling a day ahead and keep it in the fridge until you’re ready to bake.
3. How do I prevent the crust from getting soggy?
To help your crust maintain its integrity, consider pre-baking it slightly before adding the filling, or let the pies bake until the crust turns golden brown. This creates a barrier to keep things nice.
4. Can I freeze the mini pumpkin pies?
Yes, you can freeze them either before baking or after they’ve cooled. Just make sure to wrap them tightly and store in an airtight container.
5. What can I use instead of condensed milk?
Heavy cream mixed with sugar works well as an alternative if you need it.
Mini pumpkin pies in a small batch bring joy and warmth to any table. Their individual size makes them a perfect shareable treat, while the flavors will have everyone asking for seconds. With these easy instructions and a sprinkle of creativity, you’ll create miniature masterpieces that capture the spirit of pumpkin spice season. Gather your ingredients and enjoy the magic of baking these lovely treats today!
Print 8")
Mini Pumpkin Pies (Small Batch)
These mini pumpkin pies are adorable and packed with flavor. Their small size makes them a delightful treat for gatherings, letting you enjoy pumpkin without guilt.
- Total Time: 40 minutes
- Yield: 9 mini pies 1x
Ingredients
- 1 (9-inch) pie crust (125 grams), homemade or store-bought
- ½ cup pumpkin puree (125 grams)
- ¼ cup condensed milk
- ¼ cup brown sugar
- 1 teaspoon pumpkin spice blend
- ¼ teaspoon salt
- 1 egg
- Whipped cream (optional, for topping)
Instructions
- Whisk together pumpkin puree, condensed milk, brown sugar, pumpkin spice, salt, and egg in a large bowl.
- Roll out pie dough and cut out 9 circles with a cookie cutter.
- Press dough circles into muffin pan cavities.
- Fill each crust with pumpkin filling, about three-quarters full.
- Bake at 375°F for about 20 minutes, until the crust is golden.
- Cool at room temperature for 20 minutes, then leave in the oven for an additional 30 minutes.
Last Step:
Please leave a rating and comment letting us know how you liked this recipe! This helps our business to thrive and continue providing free, high-quality recipes for you.Notes
Ensure the filling is whisked well for a perfect texture.
Adjust baking time as needed since ovens may vary.
Chill whipped cream before serving for a refreshing touch.
- Prep Time: 20 minutes
- Cook Time: 20 minutes
- Category: Dessert
- Method: Baking
- Cuisine: American
Nutrition
- Calories: 180
- Sugar: 10
- Sodium: 150
- Fat: 8
- Saturated Fat: 4
- Unsaturated Fat: 3
- Trans Fat: 0
- Carbohydrates: 25
- Fiber: 1
- Protein: 2
- Cholesterol: 40