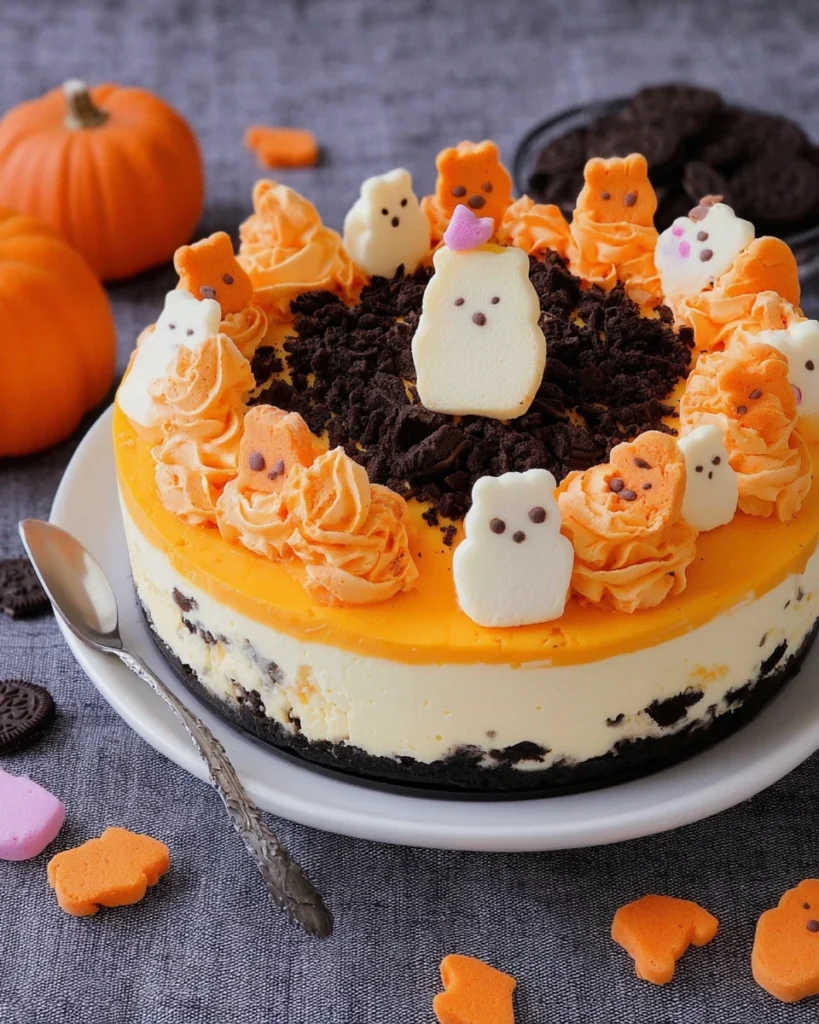
This Halloween Peeps Cheesecake (No-Bake) is the perfect treat to get you in the spooky spirit! Imagine a rich, creamy dessert that not only tastes heavenly but also looks festive with pops of color from the adorable Pumpkin Peeps. Halloween is all about fun and creativity, and this cheesecake truly captures the essence of the season. It’s easy to throw together since there’s no baking required, allowing you to enjoy your time with family and friends rather than being stuck in the kitchen.
Whether you’re hosting a Halloween party, looking for something fun to bring to a potluck, or just want to treat yourself and your loved ones, this cheesecake is a go-to recipe. The mixture of creamy filling, Oreo crust, and cute Peeps makes for a dessert that is not only delicious but also visually stunning. Plus, since you can make it a day ahead, it’s a great way to get ahead of your holiday preparations. Let’s dive right into why this Halloween Peeps Cheesecake (No-Bake) is a must-try!
Why This Recipe Works
This Halloween Peeps Cheesecake is a delightful no-bake dessert that combines creamy textures with festive flavors. The use of Oreo cookies for the crust adds a rich chocolate base, while the addition of Pumpkin Peeps introduces a fun, seasonal twist. This cheesecake doesn’t require any baking, making it easy to whip up in advance of your Halloween festivities, allowing flavors to meld beautifully while freeing up your oven for other dishes.
It’s also a cinch to make while delivering that wow factor that your guests will love. The rich cream cheese filling, combined with the sweetness of the Peeps, creates a delicious explosion of flavor. And because everything gets mixed and chilled rather than baked, you can enjoy a smooth and creamy texture throughout. It’s a recipe that pleases both the eyes and the palate!
Why You’ll Love This Halloween Peeps Cheesecake (No-Bake)
When you set your eyes on this cheesecake, it’s hard not to fall in love. The vibrant colors and playful presentation make it a showstopper, ready to steal the spotlight at any gathering. With its smooth cream cheese filling washed with chocolate and orange chips, every bite captures the spirit of Halloween.
Beyond its looks, the taste is where the magic truly happens. The contrast between the rich chocolate crust, creamy filling, and the bright sweetness of the Peeps has a delightful balance that’s hard to resist. Imagine slicing into this cheesecake, revealing layers of goodness while the fun decorations almost jump out at you! It’s not just a dessert; it’s an experience meant to be shared and savored. Whether you enjoy it at a spooky soirée or a cozy family night in, it guarantees smiles all around.

Ingredients
- 20 Oreo cookies
- 4 tbsp Butter, melted
- 2 Packages Pumpkin Peeps
- 3 Packages Cream Cheese, softened
- 1 can (14 oz) Sweetened Condensed Milk (Eagle-brand)
- 1 tsp Vanilla extract
- 1/2 cup Mini Chocolate Chips
- 1/4 cup Mini Orange Chips
- 4 tbsp Butter, softened
- 4 oz Cream Cheese, softened
- 1/4 cup Heavy Cream
- 4 cups Powdered Sugar
- Pinch of salt
- Orange Sprinkle Mix for decoration
Preparing the Cheesecake Crust

Crush the Oreo Cookies
First, grab a food processor or blender. Pop in the Oreo cookies (don’t forget the filling!) and pulse them until they turn into fine crumbs.
Mix with Butter
Next, melt the butter in the microwave for about 15 seconds. Once melted, combine it with the Oreo crumbs and stir until every crumb is perfectly coated.
Assemble the Crust
Take a 6-inch springform pan and line it with parchment paper for easier removal later. Pour the Oreo mixture into the pan and, using the back of a spoon or your fingers, press it down firmly and evenly across the bottom.
Arrange the Peeps
Now, carefully keep the Pumpkin Peeps attached in rows and arrange them against the sides of the pan atop the crust. This will give your cheesecake that festive flair as it sets. To ensure the Peeps are nestled in well, place the pan in the freezer while you prepare the filling.
Making the Cheesecake Filling
Blend the Base
With your crust and Peeps ready, it’s time for the filling. In a stand mixer, combine the softened cream cheese and sweetened condensed milk. Add the vanilla extract and blend everything together on low speed. Don’t forget to scrape down the sides occasionally to ensure even mixing.
Incorporate the Chips
When your mixture looks smooth, gently fold in the mini chocolate and orange chips. This step is important to ensure that every bite has those delightful little bursts of chocolate and fruitiness.
Fill the Pan
Now, retrieve your crust from the freezer. Pour that luscious cheesecake filling into the pan, smoothing the top with a spatula. To let it set properly, return the pan to the freezer for at least 24 hours. This allows all those flavors to meld together beautifully.
Preparing the Frosting
Mix the Base Ingredients
Time to whip up some frosting! In a clean mixing bowl, combine the softened butter and cream cheese. Blend them together until the mixture is smooth and creamy, scraping down the sides.
Add the Heavy Cream and Sugar
Incorporate the heavy cream and a pinch of salt, blending until everything is well combined. Gradually add the powdered sugar, mixing on low as you go. This helps prevent a powdered sugar explosion!
Color the Frosting
For that extra Halloween flair, add in some orange food coloring gel. Blend until you achieve your desired shade, which should brighten up your dessert beautifully.
Decorating the Cheesecake
Pipe the Frosting
Once your cheesecake is set and ready, it’s time to decorate! Transfer the orange frosting to a pastry bag fitted with a large star tip. Pipe generous dollops of frosting around the edge of the cheesecake, creating a festive border.
Add Final Touches
To finish your masterpiece, sprinkle the top with an orange sprinkle mix. This not only adds to the visuals but also gives a fun crunch when you dig in. Pop the cheesecake back in the freezer until it’s time to serve.
Serving Suggestions
When you’re ready to serve, cut the cheesecake into 2-inch pieces. This no-bake treat is best enjoyed chilled and offers a festive feel that encapsulates Halloween. For an extra seasonal touch, pair it with hot cocoa or a cider infused with fall spices.
Tips for Success
- Make sure all ingredients are at room temperature. This helps everything blend together easily.
- If you prefer a firmer cheesecake, allow it to freeze for a longer period before serving.
- Feel free to customize decorations according to your Halloween theme or your personal taste. Some fun candy additions could further heighten the spirit of the season!
Variations
- If you want to mix things up, substitute the Oreo crust with a graham cracker or another cookie base for a different flavor experience.
- You can also experiment with different flavors of Peeps to bring new tastes into the mix.
- Want to add an extra touch of sweetness? Drizzle some caramel over the top before serving!
Storage Tips
Have leftovers? No problem! You can store any remaining cheesecake in the freezer for up to a month. Just be sure to wrap it tightly in plastic wrap or keep it in an airtight container. To enjoy, simply thaw it in the refrigerator before serving.

FAQs
Q1: How long can I keep the Halloween Peeps Cheesecake?
A1: The cheesecake can be stored in the freezer for up to one month. For the best texture, thaw it in the refrigerator before serving.
Q2: Can I use different flavors of Peeps?
A2: Yes! Feel free to use different Peeps flavors to get creative with your cheesecake.
Q3: Is this recipe gluten-free?
A3: Not as it stands, since it contains Oreo cookies. But you can make it gluten-free by using gluten-free cookies for the crust.
Q4: Can I make this cheesecake ahead of time?
A4: Absolutely! This no-bake cheesecake is perfect for preparing in advance, making it a great option for parties.
Q5: Is it necessary to use a springform pan?
A5: A springform pan is recommended for easy removal, but you can also use any round pan lined with parchment paper.
This no-bake Halloween Peeps Cheesecake is an exciting dessert option for the spooky season. It combines delicious flavors with fun decorations, making it a hit at any gathering. Get ready to impress your guests with this delightful treat that pairs perfectly with festive drinks and good company!
Print
Halloween Peeps Cheesecake
This no-bake Halloween Peeps Cheesecake is a fun dessert that combines a rich creamy filling and a chocolatey Oreo crust, topped with colorful Pumpkin Peeps. It’s perfect for parties or cozy nights in.
- Total Time: 0 hours
- Yield: 8 servings 1x
Ingredients
- 20 Oreo cookies
- 4 tbsp Butter, melted
- 2 Packages Pumpkin Peeps
- 3 Packages Cream Cheese, softened
- 1 can (14 oz) Sweetened Condensed Milk (Eagle-brand)
- 1 tsp Vanilla extract
- 1/2 cup Mini Chocolate Chips
- 1/4 cup Mini Orange Chips
- 4 tbsp Butter, softened
- 4 oz Cream Cheese, softened
- 1/4 cup Heavy Cream
- 4 cups Powdered Sugar
- Pinch of salt
- Orange Sprinkle Mix for decoration
Instructions
- Crush Oreo cookies into fine crumbs.
- Mix Oreo crumbs with melted butter.
- Press the mixture into a lined springform pan.
- Arrange Pumpkin Peeps around the crust.
- Blend cream cheese, sweetened condensed milk, and vanilla until smooth.
- Fold in chocolate and orange chips.
- Pour filling into the crust and freeze for 24 hours.
- Mix butter and cream cheese for frosting.
- Add heavy cream and powdered sugar to frosting mix.
- Pipe frosting onto the cheesecake and sprinkle with decorations.
Last Step:
Please leave a rating and comment letting us know how you liked this recipe! This helps our business to thrive and continue providing free, high-quality recipes for you.Notes
Ensure all ingredients are at room temperature.
For a firmer cheesecake, freeze longer before serving.
Customize decorations to match your Halloween theme.
- Prep Time: 30 minutes
- Cook Time: None
- Category: Dessert
- Method: No-Bake
- Cuisine: American
Nutrition
- Calories: 300
- Sugar: 20
- Sodium: 200
- Fat: 18
- Saturated Fat: 10
- Unsaturated Fat: 8
- Trans Fat: 0
- Carbohydrates: 32
- Fiber: 1
- Protein: 5
- Cholesterol: 50