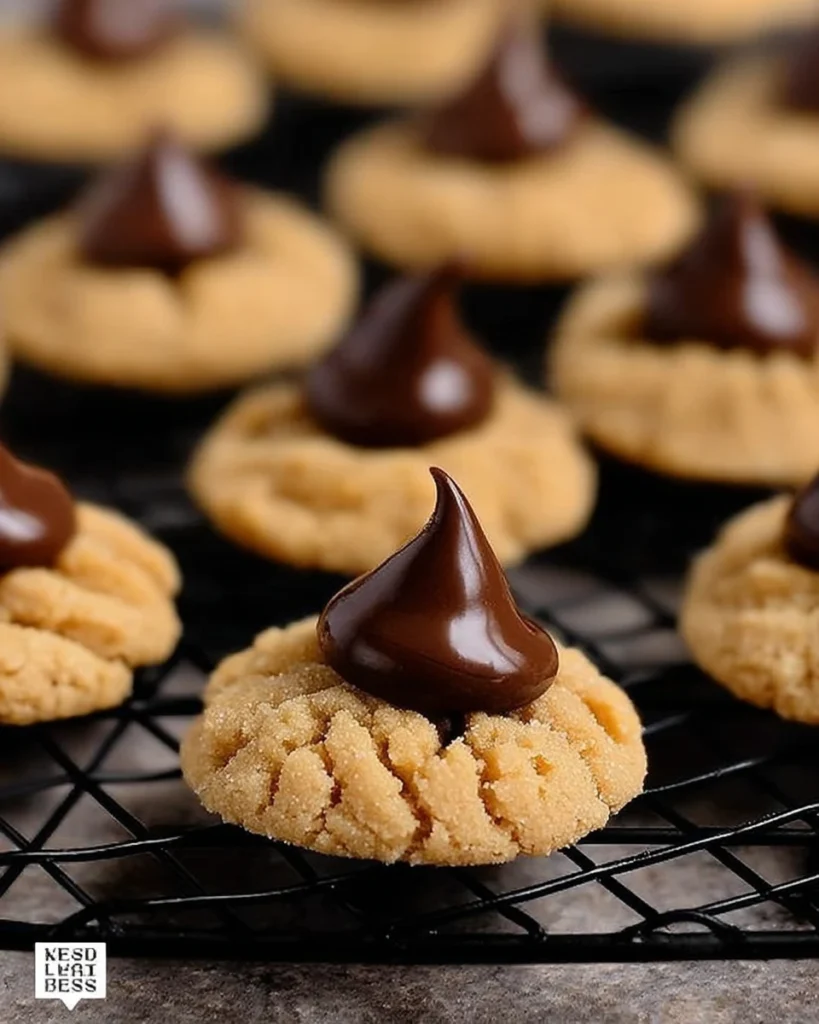
Gluten Free Peanut Butter Blossoms have a special place in many hearts. Their combination of rich peanut butter flavor and sweet chocolate makes them an irresistible treat. If you have dietary restrictions or just prefer gluten-free options, this recipe is for you. It’s perfect for sharing with friends and family or just treating yourself. The best part? They come together quickly, so you won’t be stuck in the kitchen for hours. Let’s create some delicious memories while whipping up these delightful cookies!
Why This Recipe Works
One reason this recipe is so beloved is the perfect balance of sweet and salty flavors. The salty notes of peanut butter blend seamlessly with the sweet chocolate topping, creating an incredibly satisfying treat. Plus, it’s made with gluten-free flour, so everyone can enjoy them, regardless of dietary restrictions.
Another fantastic aspect is the chewy texture provided by the peanut butter. This not only feels great in your mouth but also allows you to add mix-ins if you like. The dough is versatile, meaning you can create variations and surprising flavor combinations while still keeping the iconic peanut butter blossom shape.
Why You’ll Love This Gluten Free Peanut Butter Blossoms
These cookies carry a nostalgic weight. Many people remember them as a tradition during the holidays, bringing back warm memories of family gatherings. However, don’t let the festive vibes fool you; they are perfect for any time of year. Their quick preparation makes them a great choice for last-minute get-togethers or simple indulgences.
The joy of making Gluten Free Peanut Butter Blossoms is that they’re easy to whip up any time you need a sweet treat. Whether it’s a spontaneous visit from friends or just a quiet night at home, they bring smiles and satisfaction any day of the week.

Ingredients for Gluten Free Peanut Butter Blossoms
Here’s what you’ll need:
- 1/2 cup butter (1 stick), softened to room temperature
- 1/2 cup granulated sugar, plus more for rolling
- 1/2 cup brown sugar
- 1/2 cup peanut butter
- 1 large egg
- 1/2 teaspoon vanilla extract
- 1-1/4 cups gluten-free baking flour blend (WITH binder)
- 3/4 teaspoon baking soda
- 1/4 teaspoon salt
- 48 Hershey Kisses
Gathering these ingredients beforehand makes the process much smoother. You can also have fun mixing and measuring, which adds to the joy of baking.
Preparing Your Gluten Free Peanut Butter Blossoms

Preheat the Oven
Start by preheating your oven to 350°F. Lining a baking sheet with a silpat or parchment paper is important. This ensures your cookies won’t stick, making them easy to remove once baked.
Cream Together the Ingredients
In a large mixing bowl—use an electric mixer or handheld mixer—combine the softened butter, granulated sugar, and brown sugar. Cream these ingredients together. You want the mixture to become light and fluffy, which typically takes about one minute. This step is crucial; it incorporates air into the mixture, giving the cookies their lovely texture.
Add Egg and Vanilla
Now, scrape down the sides of the bowl so everything mixes evenly. Add the egg and vanilla extract. Mix until they’re just combined. It helps to take your time here, ensuring a smooth consistency that will result in delicious cookies.
Combine Dry Ingredients
In a separate bowl, whisk together the gluten-free baking flour blend, baking soda, and salt. Doing this first helps to ensure that your dry ingredients blend smoothly into the wet mixture later.
Mix Wet and Dry Ingredients
It’s time to bring the wet and dry ingredients together. Gradually add the dry mixture into the wet mixture, mixing in two batches. Be careful to mix until just combined. Overmixing can make the cookies tough, and we definitely want that soft, chewy texture.
Roll and Coat the Dough
Now, scoop 1 tablespoon of dough and roll it into a ball. Rolling the dough in granulated sugar gives your cookies a nice exterior. Once coated, place the dough balls on your prepared baking sheet, making sure to space them about 2 inches apart. This allows them room to spread as they bake.
Bake the Cookies
Pop the cookies into your preheated oven. Bake them for about 8-9 minutes, or until the tops just start to crack. It’s better to err on the side of under-baking; those few extra seconds can really pay off in creating that desired chewy texture.
Add Hershey Kisses
Once you’ve pulled the cookies from the oven, immediately press a Hershey Kiss into the center of each warm cookie gently. The heat will melt the chocolate just enough to anchor it in place. Allow your cookies to sit for a moment before transferring them to a cooling rack.
Cool Completely
Now, let the cookies cool completely on the rack. This allows them to firm up and maintain their shape. Plus, the excitement of waiting makes them taste even better!
Serving Suggestions
For the ultimate indulgence, pair these cookies with a tall glass of cold milk or a steaming cup of coffee. The flavor combinations are simply divine together. Additionally, serving them on a decorative platter at holiday gatherings is sure to make these cookies a standout dessert.
Tips for Success
A few tips will help ensure your baking adventure is a success. First, always check that your gluten-free flour blend contains a binder, like xanthan gum. This will give your cookies the best texture. Also, check your oven’s temperature accuracy with an oven thermometer; slight variations can affect how your cookies bake.
Variations
If you’re feeling adventurous, try swapping out Hershey Kisses for peanut butter cups for a richer flavor. Another idea is to add chocolate chips or chopped nuts into the dough for added texture and flavor.
Storage Tips
Once your delightful cookies have cooled, store them in an airtight container at room temperature. They will stay fresh for up to one week. For longer storage, freeze them in a single layer and then transfer to a freezer bag. They can last up to three months in the freezer.

FAQs
1. Can I use creamy or crunchy peanut butter?
Absolutely! Both options will work well, but creamy will yield a smoother texture.
2. Are Hershey Kisses gluten-free?
Yes, regular Hershey Kisses are gluten-free, making them perfect for this recipe.
3. Can I make these cookies dairy-free?
Definitely! You can use dairy-free alternatives like coconut oil or vegan butter for a delicious outcome.
4. How do I know when to take the cookies out of the oven?
Look for the tops to begin cracking. Under-baking slightly will give you that desired chewy cookie.
5. What should I do if my dough is too sticky?
If the dough feels sticky, chilling it in the refrigerator for 30 minutes before rolling will help.
These cheerful Gluten Free Peanut Butter Blossoms are not merely cookies—they’re bite-sized smiles. With their soft texture and delicious chocolate kiss, they warm the heart and bring joy to any occasion. Baking isn’t just about satisfying a sweet tooth; it’s about sharing warmth, love, and happy moments. Whether during the holidays or as an everyday treat, these cookies will surely create beautiful memories in your kitchen. So, gather your ingredients and enjoy that delightful aroma as they bake!
Print
Gluten Free Peanut Butter Blossoms
These cookies are a delicious blend of rich peanut butter and chocolate, easy to make and perfect for satisfying your sweet cravings anytime.
- Total Time: 24 minutes
- Yield: 48 cookies 1x
Ingredients
- 1/2 cup butter (1 stick), softened to room temperature
- 1/2 cup granulated sugar, plus more for rolling
- 1/2 cup brown sugar
- 1/2 cup peanut butter
- 1 large egg
- 1/2 teaspoon vanilla extract
- 1–1/4 cups gluten-free baking flour blend (WITH binder)
- 3/4 teaspoon baking soda
- 1/4 teaspoon salt
- 48 Hershey Kisses
Instructions
- Preheat oven to 350°F and line a baking sheet with parchment.
- Cream together butter, granulated sugar, and brown sugar until fluffy.
- Add egg and vanilla, mixing until just combined.
- In a separate bowl, whisk together gluten-free flour, baking soda, and salt.
- Gradually combine wet and dry ingredients, mixing until just combined.
- Scoop 1 tablespoon of dough, roll into balls, and coat in sugar.
- Place on baking sheet, spacing them 2 inches apart.
- Bake for 8-9 minutes until tops crack slightly.
- Press a Hershey Kiss into the center of each warm cookie.
- Cool completely on a rack.
Last Step:
Please leave a rating and comment letting us know how you liked this recipe! This helps our business to thrive and continue providing free, high-quality recipes for you.Notes
Ensure gluten-free flour blend contains a binder for the best texture.
Check oven temperature accuracy with a thermometer for even baking.
Cookies can be stored in an airtight container for up to one week.
- Prep Time: 15 minutes
- Cook Time: 9 minutes
- Category: Dessert
- Method: Baking
- Cuisine: American
Nutrition
- Calories: 100
- Sugar: 7g
- Sodium: 50mg
- Fat: 4g
- Saturated Fat: 2g
- Unsaturated Fat: 2g
- Trans Fat: 0g
- Carbohydrates: 14g
- Fiber: 1g
- Protein: 2g
- Cholesterol: 15mg


You did not say when to add the peanut butter
Directions
Preheat oven to 350 degrees then line a baking sheet with a silpat or parchment paper and set aside. Scoop some granulated sugar into a bowl then set aside.
Add butter, sugars, and peanut butter to the bowl of an electric mixer, or to a large glass bowl if using a handheld mixer, then cream until light and fluffy, about one minute. Scrape down the sides of the bowl then add the egg and vanilla and mix until just combined.
In a separate bowl, whisk together flour, baking soda, and salt then add to the wet ingredients in two batches, mixing until just combined before adding the next batch.
Scoop 1 Tablespoon batter at a time into the sugar bowl then gently turn to coat and place on prepared baking sheet. Bake until the tops of the cookies just barely begin to crack, 8-9 minutes (err on the side of under-baking vs over-baking), then remove from oven and gently press a Hershey Kiss into the center of each cookie. Transfer cookies to a cooling rack then let cool completely.