Creating an Easy Sourdough Starter at home is like opening a door to a wonderful world of baking. It’s all about taking flour and water, the simplest ingredients, and bringing them to life. As you tend to your starter over the week, you’ll discover how it transforms into a bubbly, flavorful mix that raises your bread to new heights. Nothing compares to that moment when your kitchen fills with the warm, inviting smell of freshly baked sourdough. The anticipation grows as you watch your starter flourish, and even small daily rituals can become enjoyable little moments. What’s even better? You don’t need to be a professional baker to master this process. With just a little time and patience, you can create a starter that will elevate your bread-making game dramatically. So let’s roll up our sleeves and get ready to embark on this exciting sourdough journey!
Why This Recipe Works
Creating an Easy Sourdough Starter at home transforms simple ingredients into a living culture that can elevate your bread-making game. The balance of flour and water develops natural yeast and beneficial bacteria, resulting in a fluffy interior and a crispy crust. This recipe outlines a straightforward method for nurturing your starter over a week, ensuring you understand each step for optimal results. You’ll see how each day builds on the last, creating something truly special.
Why You’ll Love This Easy Sourdough Starter
This Easy Sourdough Starter is perfect for both beginners and experienced bakers. It demystifies the process of sourdough baking, giving you confidence to produce delicious loaves in your own kitchen. The satisfaction of cultivating something from scratch adds an exciting edge to your cooking repertoire. Plus, it opens the door to countless sustainable sourdough recipes! Imagine the joy of crafting various dishes with your homemade starter, turning everyday ingredients into something gourmet.

Ingredients
- 700 grams white all-purpose flour (see Note #1 below)
- 700 grams filtered water
Day-by-Day Instructions to Cultivate Your Sourdough Starter

Day 1: Initiating Your Starter
In a medium-sized glass bowl, combine 50 grams of water and 50 grams of flour. Stir thoroughly until there are no dry bits of flour. Cover the bowl with a clean cloth or plastic wrap and let it sit at room temperature. This simple mix is the first step to capturing the wild yeast around you.
Day 2: Feeding Your Starter
To your Day 1 mixture, add an additional 50 grams of flour and 50 grams of water. Stir well to combine. Cover it again and allow it to rest at room temperature, maintaining a stable environment. You might start to notice tiny bubbles, which is a great sign!
Day 3: Discard and Feed
Throw away half of the starter (approximately 100 grams). To the remaining starter, add 100 grams of flour and 100 grams of water. Mix well, cover, and set it aside at room temperature. Discarding some of the starter is crucial; it ensures that your mixture remains lively and not overcrowded.
Day 4: Continued Growth
Discard half of your starter once more. Add 150 grams of flour and 150 grams of water to the remaining mixture. Stir thoroughly, cover, and let it rest at room temperature. At this point, your starter should have a pleasant smell and be bubbling more actively.
Day 5: Building Strength
As with the previous days, discard half of the starter. Then, incorporate 150 grams of flour and 150 grams of water. Stir well, ensure it’s covered, and leave it at room temperature. You’re really nurturing that culture now, letting it develop strength.
Day 6: Nourishing the Culture
Follow the same pattern: discard half of the starter. Add 200 grams of flour and 200 grams of water. Mix thoroughly, cover, and let sit at room temperature. Pay attention to those rising bubbles; they’re a clear indication that your starter is getting happy!
Day 7: Ready to Use
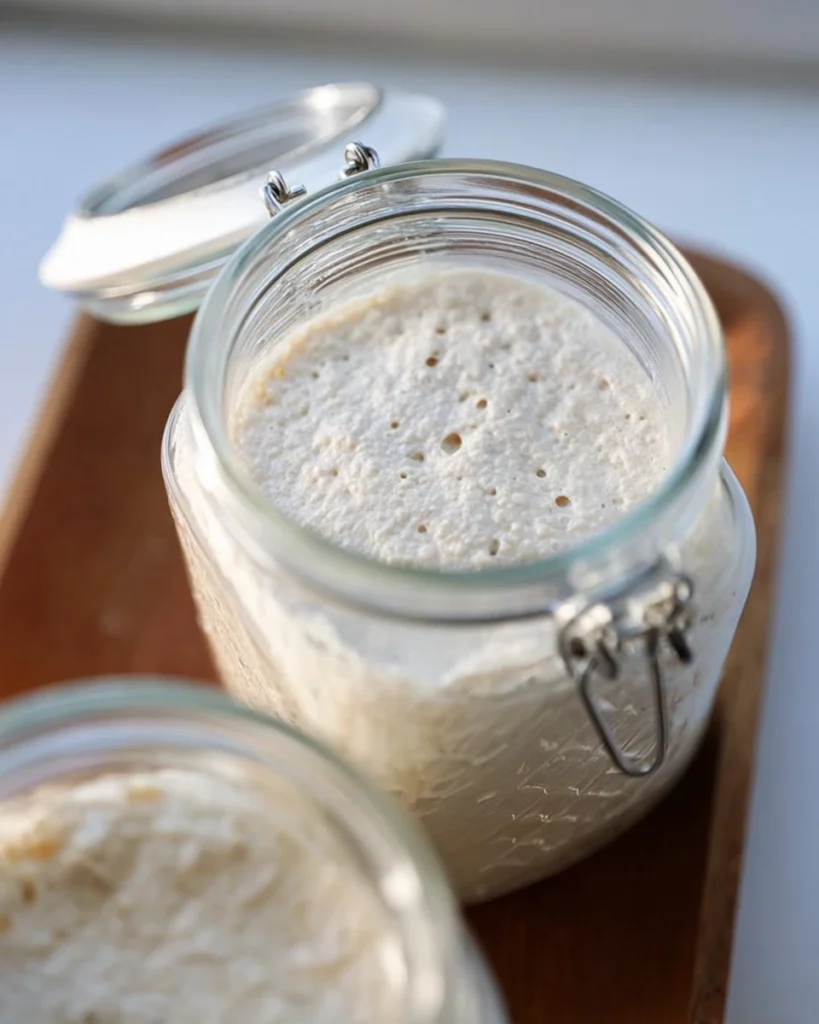
By the end of the week, your starter should show significant bubbles and rise in volume. If it looks similar to photo C in your reference, it’s ready for baking. If it resembles photo B, allow it to sit for one more day. That final jump in activity means you’re ready to enjoy your sourdough!
Serving Suggestions
- Use your sourdough starter to bake classic loaves, pancakes, or waffles.
- Pair sourdough with gourmet cheeses, fresh charcuterie, or homemade spreads for a delightful brunch. The possibilities truly are endless!
Tips for Success
- Ensure all utensils and containers are clean to avoid any unwanted bacteria.
- Keep the starter in a warm place, ideally around 70-75°F (21-24°C) for optimal fermentation.
- Consistency is key; feed your starter at the same time every day for the best results. This routine nurtures a thriving sourdough champion.
Variations
- Experiment with whole wheat or rye flour for a different flavor profile. Each flour brings its unique spin!
- Incorporate herbs or spices into your feeding for unique tastes that elevate your green-topped bread.
Storage Tips
- To store your starter long-term, keep it refrigerated and feed it once a week. A little care goes a long way in preserving your effort.
- Before using, feed it and let it sit at room temperature for a few hours to reactivate. This gives your starter that fantastic rise when it hits the oven.

FAQs
Q1: How do I know if my sourdough starter is healthy?
A1: A healthy starter should be bubbly, have a pleasant sour smell, and double in size after feeding. You’ll get the hang of assessing its condition as you watch it grow!
Q2: Can I use tap water for my starter?
A2: It’s best to use filtered water, as chlorine and other chemicals in tap water can inhibit yeast activity. Treat your starter like the precious creation it is!
Q3: What can I do if my starter isn’t rising?
A3: Ensure it’s warm enough and consider giving it more frequent feedings to boost fermentation. Sometimes it just needs a little extra love.
Q4: How often should I feed my starter?
A4: Once your starter is established, it typically needs feeding once a day at room temperature or once a week if stored in the fridge. Choose a schedule that fits best with your routine.
Q5: Can I freeze my sourdough starter?
A5: Yes, you can freeze it! Just ensure to feed it before freezing and thaw it in the fridge when ready to use. It can go into hibernation until you’re ready for some more baking adventures.
Creating your own Easy Sourdough Starter not only allows you to bake delicious, artisanal bread but also connects you with the age-old tradition of sourdough baking. Each step you take to nurture this starter becomes a labor of love, resulting in the satisfaction of home-baked bread that brings the comforting aroma of freshly baked goods right into your kitchen. Embrace this simple process, experiment with flavors, and let your starter be the foundation of countless delicious recipes ahead!
Print
Easy Sourdough Starter
This Easy Sourdough Starter transforms simple ingredients into a lively culture, perfect for baking delicious bread. It’s beginner-friendly and fosters creativity in your kitchen.
- Total Time: 0 hours
- Yield: 1 starter 1x
Ingredients
- 700 grams white all-purpose flour
- 700 grams filtered water
Instructions
- Day 1: Mix 50g flour and 50g water in a bowl. Cover and let sit.
- Day 2: Add 50g flour and 50g water to the mixture. Cover and let sit.
- Day 3: Discard half the starter. Add 100g flour and 100g water. Mix and cover.
- Day 4: Discard half the starter. Add 150g flour and 150g water. Mix and cover.
- Day 5: Discard half the starter. Add 150g flour and 150g water. Mix and cover.
- Day 6: Discard half the starter. Add 200g flour and 200g water. Mix and cover.
- Day 7: Check for bubbles and volume. If ready, use for baking.
Last Step:
Please leave a rating and comment letting us know how you liked this recipe! This helps our business to thrive and continue providing free, high-quality recipes for you.Notes
Ensure clean utensils to prevent unwanted bacteria.
Feed the starter consistently at the same time daily for best results.
- Prep Time: 1 day
- Cook Time: N/A
- Category: Starter
- Method: Cultivating
- Cuisine: Baking
Nutrition
- Calories: 60
- Sugar: 0.1
- Sodium: 1
- Fat: 0.2
- Saturated Fat: 0
- Unsaturated Fat: 0.1
- Trans Fat: 0
- Carbohydrates: 13
- Fiber: 0.4
- Protein: 2
- Cholesterol: 0