Creating Dirt Pudding Cups is like taking a delightful trip down memory lane, right back to childhood. Remember the thrill of layering cookie crumbs, pudding, and gummy worms? Well, this no-bake dessert captures all that joy and whimsy in one delightful cup. It’s simple enough for anyone to whip up, making it perfect for Halloween parties, birthdays, or just a fun family night. As you layer creamy chocolate pudding with crushed Oreos, you’ll find that the result is not just visually enchanting, but deliciously satisfying as well. Imagine digging in and discovering that hidden treasure of candy within the layers. It’s a nostalgic treat that brings smiles to faces of all ages. So, let’s roll up our sleeves and create these Dirt Pudding Cups together!
Why This Recipe Works
Creating Dirt Pudding Cups combines the ease of no-bake desserts with the joy of whimsical presentation. This recipe leverages creamy homemade chocolate pudding and childhood favorites like gummy worms and Oreo cookies to craft an enticing treat that’s bound to impress. The layers make them visually appealing, drawing people’s attention at any gathering. Plus, who doesn’t love the combination of cookies and creamy pudding?
Why You’ll Love This Dirt Pudding Cups
These Dirt Pudding Cups are perfect for Halloween gatherings, birthday parties, or any occasion that calls for a bit of spooky fun. They’re simple to make yet deliver a delightful visual and tasty experience that appeals to both kids and adults alike. You’ll find that everyone loves the memory of digging through the “dirt” to find the candy “worms” nestled within. It’s a dessert that encourages laughter and engagement, making each bite even more enjoyable.

Ingredients
- For the Chocolate Pudding:
- ⅓ cup granulated sugar
- ¼ cup unsweetened cocoa powder
- 3 tablespoons cornstarch
- ¼ teaspoon salt
- 2 large egg yolks, beaten
- 2 cups whole milk
- 1½ tablespoons unsalted butter
- ¼ cup semi-sweet chocolate, melted
- 2 teaspoons vanilla extract
-
Ice cubes (for the water bath)
-
For Assembling the Dirt Pudding:
- 1 cup Oreo cookies (about 10-12)
- 12 gummy worms
Making the Chocolate Pudding

Whisk the Base Ingredients
Start by grabbing a medium saucepan and whisk together the granulated sugar, cocoa powder, cornstarch, salt, and beaten egg yolks until everything is fully blended. This creates a rich base for your pudding.
Heat and Thicken the Mixture
Next, pour in the milk and cook over medium heat. Stir often for about 5-8 minutes until you see the mixture start bubbling. Lower the heat to cook for an additional 1-2 minutes until it thickens — you want it to be pourable but still creamy and smooth.
Add Butter and Chocolate
Now, remove your saucepan from the heat. Whisk in the unsalted butter, melted semi-sweet chocolate, and vanilla extract until everything is beautifully smooth. If you notice any lumps, you can strain the mixture through a fine mesh sieve for that perfect texture.
Ice Bath to Cool
To cool the pudding quickly, prepare an ice bath in a large bowl. Place the saucepan in this ice bath, stirring occasionally until the pudding reaches room temperature — this will take about 30 minutes.
Refrigerate
Finally, cover the pudding and pop it in the refrigerator for at least 4 hours. If you can, go for up to 2 days; the longer it chills, the better the texture becomes. Trust me, patience pays off!
Assembling the Dirt Pudding Cups
Crush the Oreo Cookies
While the pudding chills, it’s time to turn those Oreo cookies into “dirt.” Use a food processor to crush them, or place them in a ziplock bag and crush them with a rolling pin. Set aside the crumbs, ready for layering.
Layer the Pudding
Once your chocolate pudding is nice and chilled, it’s time to assemble! Divide the pudding evenly into 4 small cups, using about ½ cup of pudding in each cup.
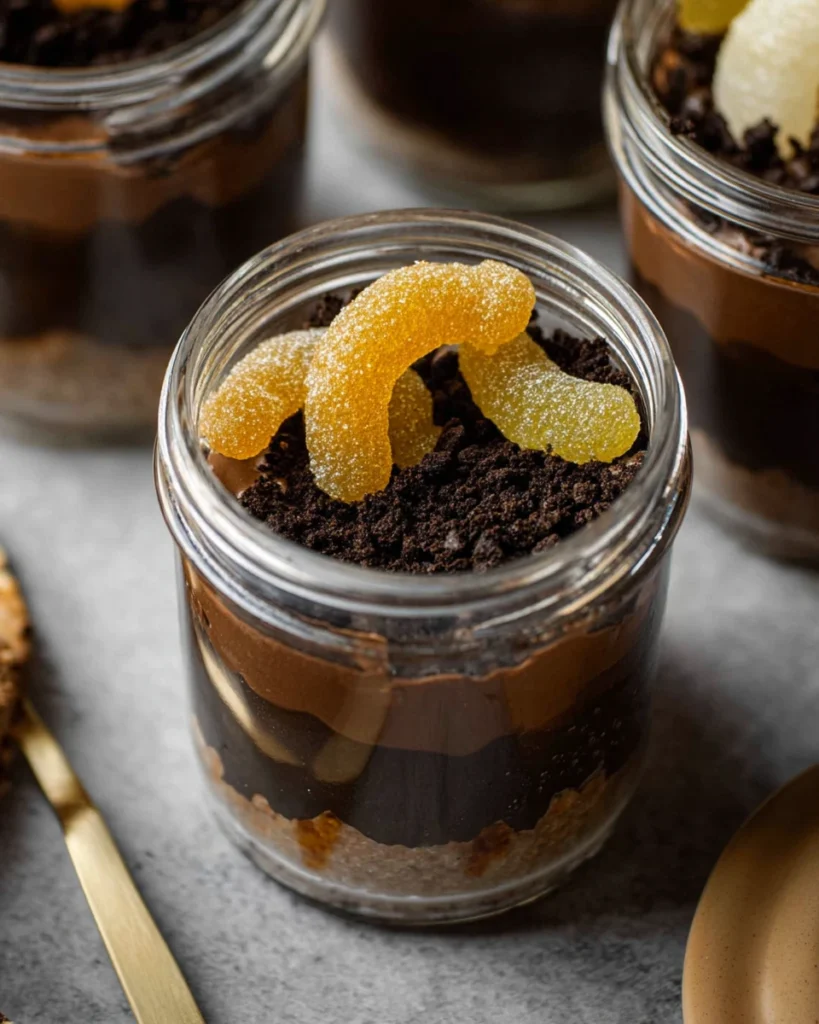
Top with Dirt
Sprinkle the crushed Oreo cookies over the pudding until each cup resembles dirt. Then, for the ultimate creepy effect, place a few gummy worms on top. This is where the fun really shines — everyone loves the sight of those squiggly worms!
Serving Suggestions
You can serve your Dirt Pudding Cups immediately or chill them just a bit longer until you’re ready for that “wow” moment. They make a fantastic, interactive dessert for parties, where everyone can dig in and enjoy.
Tips for Success
- For an extra chocolatey flavor, why not consider adding mini chocolate chips as a topping along with the gummy worms? Just a little extra touch can go a long way.
- Make sure to chill the pudding fully before assembling. Achieving the best texture is vital for a successful dessert.
- Feel free to customize the number of gummy worms per cup according to preference or for different occasions.
Variations
- Vegan Version: If you want a dairy-free treat, substitute almond milk for whole milk and use an egg replacer for the pudding.
- Nut Allergy: You can easily replace Oreo cookies with chocolate sandwich cookies that are nut-free.
- Add-ins: Think about including crushed candy bars or colorful sprinkles for added texture and visual appeal!
Storage Tips
Your Dirt Pudding Cups can be stored in the refrigerator for up to 2 days. Just make sure to keep them covered to maintain freshness. It’s best to add the cookie topping right before serving to ensure that satisfying crunch.
Pairing Ideas
These Dirt Pudding Cups pair wonderfully with something light and fruity, like orange sorbet, or a refreshing mint smoothie after a heavy meal. Mixing flavors can balance out the richness of the pudding!

FAQs
1. Can I use store-bought pudding instead of making it from scratch?
Absolutely! Using store-bought pudding is a quick alternative that works perfectly for this recipe.
2. How long can I store the Dirt Pudding Cups?
They can be stored in the refrigerator for up to 2 days, but remember, the cookie topping is best added just before you serve.
3. Can I freeze the Dirt Pudding Cups?
Freezing isn’t recommended, as the texture of the pudding may change once it’s thawed.
4. What can I substitute for gummy worms?
Get creative! You can use any gummy candy, chocolate bugs, or even fruit snacks depending on your liking.
5. Are there any allergy considerations?
Yes, you can make adjustments for dairy-free, egg-free, or nut-free diets. Please refer to the variations section for convenient substitutes.
These Dirt Pudding Cups are not just a dessert; they’re an experience! Their combination of textures and flavors brings back childhood memories while also delighting your taste buds. Enjoy making, serving, and sharing this fun treat!
Print
Dirt Pudding Cups
Dirt Pudding Cups are a whimsical and nostalgic dessert that combines creamy chocolate pudding with crushed Oreos and playful gummy worms. This no-bake treat is simple to prepare, making it ideal for Halloween parties, birthdays, or fun family gatherings.
- Total Time: 40 minutes
- Yield: 4 cups 1x
Ingredients
- ⅓ cup granulated sugar
- ¼ cup unsweetened cocoa powder
- 3 tablespoons cornstarch
- ¼ teaspoon salt
- 2 large egg yolks, beaten
- 2 cups whole milk
- 1½ tablespoons unsalted butter
- ¼ cup semi-sweet chocolate, melted
- 2 teaspoons vanilla extract
- Ice cubes (for the water bath)
- 1 cup Oreo cookies (about 10-12)
- 12 gummy worms
Instructions
- Whisk together the sugar, cocoa powder, cornstarch, salt, and egg yolks in a medium saucepan.
- Pour in the milk, cook over medium heat while stirring until bubbling, then lower heat and continue for 1-2 minutes until thickened.
- Remove from heat and whisk in butter, melted chocolate, and vanilla extract until smooth.
- Place saucepan in an ice bath to cool, stirring occasionally until room temperature.
- Cover and refrigerate for at least 4 hours.
- Crush Oreo cookies while pudding chills for layering.
- Divide pudding into cups and layer with crushed Oreos and gummy worms.
Last Step:
Please leave a rating and comment letting us know how you liked this recipe! This helps our business to thrive and continue providing free, high-quality recipes for you.Notes
For extra chocolate flavor, consider adding mini chocolate chips on top.
Ensure pudding is fully chilled for the best texture.
Adjust gummy worms quantity based on preference.
- Prep Time: 30 minutes
- Cook Time: 10 minutes
- Category: Dessert
- Method: No-Bake
- Cuisine: American
Nutrition
- Calories: 320
- Sugar: 28
- Sodium: 200
- Fat: 15
- Saturated Fat: 8
- Unsaturated Fat: 5
- Trans Fat: 0
- Carbohydrates: 45
- Fiber: 2
- Protein: 4
- Cholesterol: 60