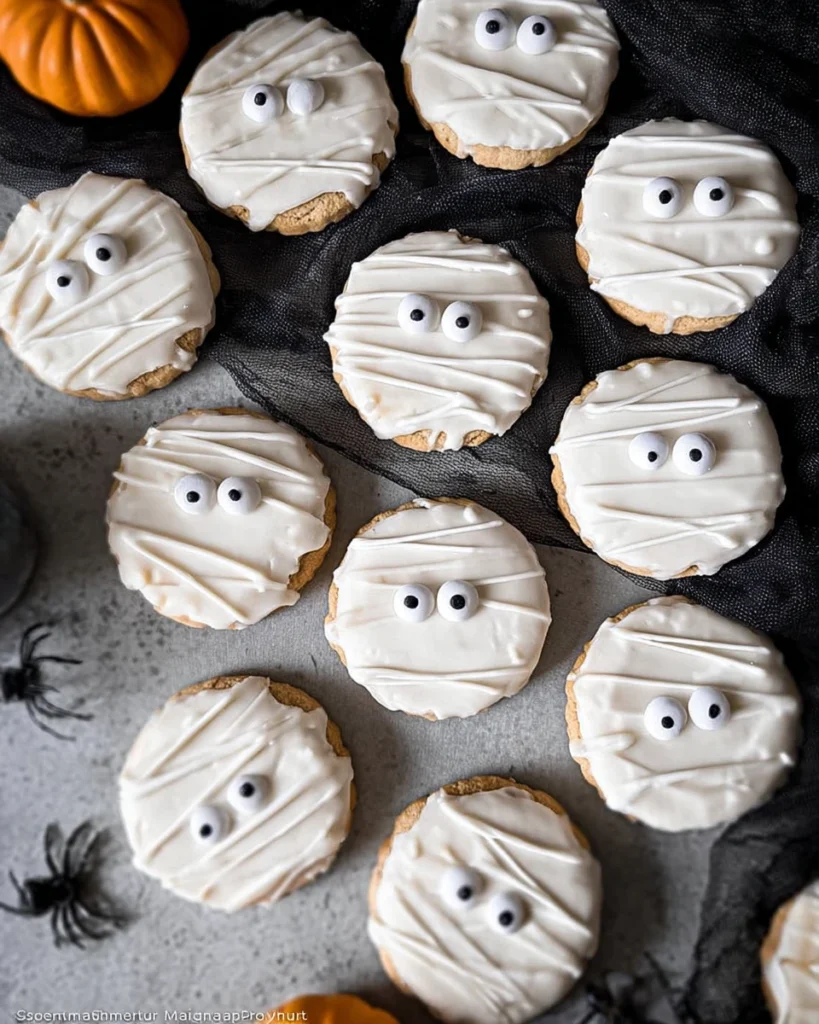
Mummy Cookies are a sweet way to celebrate the spooky season! Imagine walking into a Halloween party and seeing a platter filled with adorable cookies that look like little wrapped mummies, just waiting to be enjoyed. These cookies not only have a delightful taste that will keep you coming back for more, but they also allow for a creative and fun decorating experience that you can share with friends and family.
Whether you’re baking with kids or looking to impress guests at a gathering, these cookies are perfect for creating memorable moments in the kitchen. Plus, the joy of piping on the royal icing and placing the candy eyes can make anyone’s day a little brighter. So, grab your apron and let’s get started on making some cute and delicious Mummy Cookies that are sure to be the highlight of your Halloween festivities!
Why This Recipe Works
Mummy Cookies combine the buttery goodness of traditional sugar cookies with a visually stunning, playful design. The use of royal icing not only creates an eye-catching presentation but also provides a delicious sweet complement to the soft cookie. This delightful combination makes for perfect treats that are sure to impress at any Halloween party or festive gathering.
Why You’ll Love This Mummy Cookies
These Mummy Cookies are not only fun to make but also a great way to involve children and friends in the kitchen during spooky season. The creativity involved in decorating each cookie ensures an enjoyable experience, while the delicious flavor keeps everyone coming back for more. Perfect for sharing or decorating your Halloween table, these cookies are sure to become a seasonal favorite!

Ingredients
- 1 cup unsalted butter, softened
- 1 cup powdered sugar
- 2 small eggs
- 1 1/2 teaspoons vanilla extract
- ½ teaspoon salt
- ⅓ cup cornstarch
- 3 ½ cups all-purpose flour
- 1 1/2 cups powdered sugar (for royal icing)
- 2 1/4 tablespoons warm water
- 1 tablespoon meringue powder
- 1/4 teaspoon clear flavor extract
Making the Cookie Dough

Creaming Butter and Sugar
First, start with your creaming process. In a stand mixer fitted with a paddle attachment, mix the softened butter and 1 cup of powdered sugar on medium speed until creamy and well combined. This step is crucial as it creates a light texture for our cookies.
Adding Eggs and Vanilla
Now, add the two small eggs along with 1 1/2 teaspoons of vanilla extract to your creamy mixture. Beat until everything is well mixed. The vanilla adds a lovely flavor to your cookies—don’t skip this!
Combining Dry Ingredients
While that’s happening, grab a separate bowl and whisk together the 3 ½ cups of all-purpose flour, ½ teaspoon of salt, and ⅓ cup cornstarch. The combination of flour and cornstarch will help create that perfect cookie consistency.
Mixing Wet and Dry Ingredients
Next, gradually add the dry flour mixture into the wet ingredients. Keep the mixer on low speed until everything is fully combined. Make sure to scrape down the sides of the bowl occasionally. You want every bit of flour incorporated.
Chilling the Dough
Once your dough is ready, roll it out into a sheet about 1/4 inch thick. Place it on parchment paper or an acrylic sheet, then chill it in the refrigerator for about 30 minutes. Chilling helps the dough hold its shape while baking.
Baking the Cookies
Now it’s time to bake! Preheat your oven to 350°F and spray a baking sheet with non-stick spray. After the dough has chilled, cut out fun shapes from it and place them on the prepared baking sheet. Bake for 12 to 15 minutes or until you see the edges turning golden. Once baked, let the cookies cool completely for at least one hour. This cooling period is important before you apply the royal icing.
Preparing the Royal Icing
Whisking the Icing
In another stand mixer, combine 1 1/2 cups of powdered sugar, 1 tablespoon of meringue powder, 2 1/4 tablespoons of warm water, and 1/4 teaspoon of clear flavor extract. Whisk everything together on medium-high speed until fluffy and stiff peaks form, which should take about 4 to 5 minutes.
Achieving the Right Consistency
Check the consistency of your icing. If it feels too thick, add warm water a tiny bit at a time until you reach a middle ground. The icing should take about 15 seconds to disappear when dripped.
Preparing for Decorating
Once your icing is at the right consistency, transfer it into a piping bag or a zip-top bag. Seal it tightly and cut off a small tip at the bottom. Now, you’re all set to decorate!
Decorating the Mummy Cookies
Outlining the Cookies
Start decorating by outlining each cookie with royal icing. Use a spiral motion to fill in the center, then smooth it out with a toothpick or decorating tool for a nice finish. Don’t forget to place the candy eyes before the icing sets!
Drizzling the “Bandages”
When the base icing has set just a bit, drizzle more icing over the cookies to make them look like mummy wrappings. Just be careful not to cover those adorable candy eyes.
Serving Suggestions
These Mummy Cookies make a fantastic treat for any festive gathering. Serve them alongside a tall glass of milk or some warm apple cider. They’re also great as party favors or fun additions to school Halloween parties.
Tips for Success
- Use softened butter at room temperature; it makes mixing much easier.
- Be patient with the chilling process; this helps keep the cookies from spreading too much during baking.
- Don’t hesitate to experiment; you can use different candy eyes or decorations for a fun twist!
Variations
For a unique touch, try replacing the vanilla extract in the royal icing with flavors like almond or lemon. You can also add colored frosting to create spooky variations, like candy corn or pumpkin shapes that can accompany your Mummy Cookies.
Storage Tips
To keep your cookies fresh, store Mummy Cookies in an airtight container at room temperature for up to one week. If you’d like them to last longer, freeze the undecorated cookies for up to three months. Just make sure to frost them after thawing for the best results!

FAQs
1. Can I use regular eggs instead of small eggs?
Yes, regular eggs will work; just adjust the quantity based on how much liquid is needed in your dough.
2. What if I don’t have meringue powder?
If you lack meringue powder, you can substitute with egg whites, but ensure they are pasteurized for safety.
3. How can I make the icing more vibrant in color?
Use gel food coloring; it’s great for achieving deep colors without changing the icing consistency.
4. Can I freeze decorated cookies?
Yes, though freezing them undecorated is best. Frost them after thawing for the best presentation.
5. How can I adjust the recipe for dietary restrictions?
For gluten-free options, substitute all-purpose flour with a gluten-free variety. You can also use plant-based butter and egg substitutes for vegan cookies.
These delightful Mummy Cookies are perfect for adding a festive touch to your Halloween celebrations! With their sweet flavor and charming design, they are an excellent treat for both kids and adults. Enjoy baking, decorating, and sharing these spooky delights with family and friends!
Print
Mummy Cookies
Mummy Cookies are delightful treats that blend buttery sugar cookie flavor with a playful mummy design, making them ideal for Halloween celebrations.
- Total Time: 35 minutes
- Yield: 24 cookies 1x
Ingredients
- 1 cup unsalted butter, softened
- 1 cup powdered sugar
- 2 small eggs
- 1 1/2 teaspoons vanilla extract
- ½ teaspoon salt
- ⅓ cup cornstarch
- 3 ½ cups all-purpose flour
- 1 1/2 cups powdered sugar (for royal icing)
- 2 1/4 tablespoons warm water
- 1 tablespoon meringue powder
- 1/4 teaspoon clear flavor extract
Instructions
- Cream softened butter and powdered sugar until creamy.
- Add eggs and vanilla; mix until well combined.
- Whisk flour, salt, and cornstarch in a separate bowl.
- Gradually add dry ingredients to wet, mixing until combined.
- Roll dough to 1/4 inch thick and chill for 30 minutes.
- Preheat oven to 350°F; cut shapes from dough and bake for 12 to 15 minutes.
- Cool cookies completely before decorating.
- Mix royal icing ingredients until stiff peaks form.
- Transfer icing to a piping bag and decorate cookies.
- Add candy eyes and drizzle icing for mummy bandages.
Last Step:
Please leave a rating and comment letting us know how you liked this recipe! This helps our business to thrive and continue providing free, high-quality recipes for you.Notes
Use softened butter for easier mixing.
Patience with chilling ensures better cookie shape.
Feel free to experiment with different decorations.
- Prep Time: 20 minutes
- Cook Time: 15 minutes
- Category: Dessert
- Method: Baking
- Cuisine: American
Nutrition
- Calories: 150
- Sugar: 10g
- Sodium: 50mg
- Fat: 7g
- Saturated Fat: 4g
- Unsaturated Fat: 2g
- Trans Fat: 0g
- Carbohydrates: 21g
- Fiber: 0g
- Protein: 2g
- Cholesterol: 25mg