Creating Halloween Pudding Cups is such a fun way to celebrate the spooky season! These delightful desserts are not only easy to make but also bring a splash of festive spirit to your gatherings. Picture this: a creamy orange layer peeking out from beneath a crunchy Oreo crumble, topped with a whimsical green layer that reminds you of classic Halloween characters. It’s like all your favorite childhood flavors rolled into one cute cup! Whether you’re planning a party, a family night, or simply want to impress your kids, these pudding cups are sure to be a hit. Plus, the best part? You can get creative and personalize them however you like. Let’s get started on making these delightful Halloween Pudding Cups!
Why This Recipe Works
Creating Halloween Pudding Cups is an exciting and interactive way to celebrate the season while making delightful treats for gatherings. The combination of instant pudding mix and fun colors allows for quick preparation, ensuring that even novice cooks can whip up these festive desserts in no time.
Why You’ll Love This Halloween Pudding Cups
These Halloween Pudding Cups are not only visually appealing but also provide a delightful mix of flavors and textures. The creamy pudding, crunchy Oreo topping, and whimsical designs make these cups perfect for family-friendly parties, school events, or even a cozy night in. You’ll love how easy they are to modify and personalize for your own spooky celebrations!

Ingredients
- 2 boxes of white chocolate instant pudding
- 4 cups of milk
- Orange food coloring
- Green food coloring
- 10 Oreo cookies
Preparing the Orange Pudding Layer

Whisk Together Pudding and Milk
In a mixing bowl, combine one box of instant pudding mix with 2 cups of milk. Use a whisk to blend them together until smooth. This is where the magic begins!
Let it Set
Allow the mixture to sit for a few minutes until it achieves a thicker consistency, perfect for layering in the cups. You’ll feel the excitement building as you prepare for the next step.
Add Some Halloween Spirit
Stir in a few drops of orange food coloring until the desired hue is reached. This vibrant color will create a fun Halloween-themed pudding that children will absolutely adore.
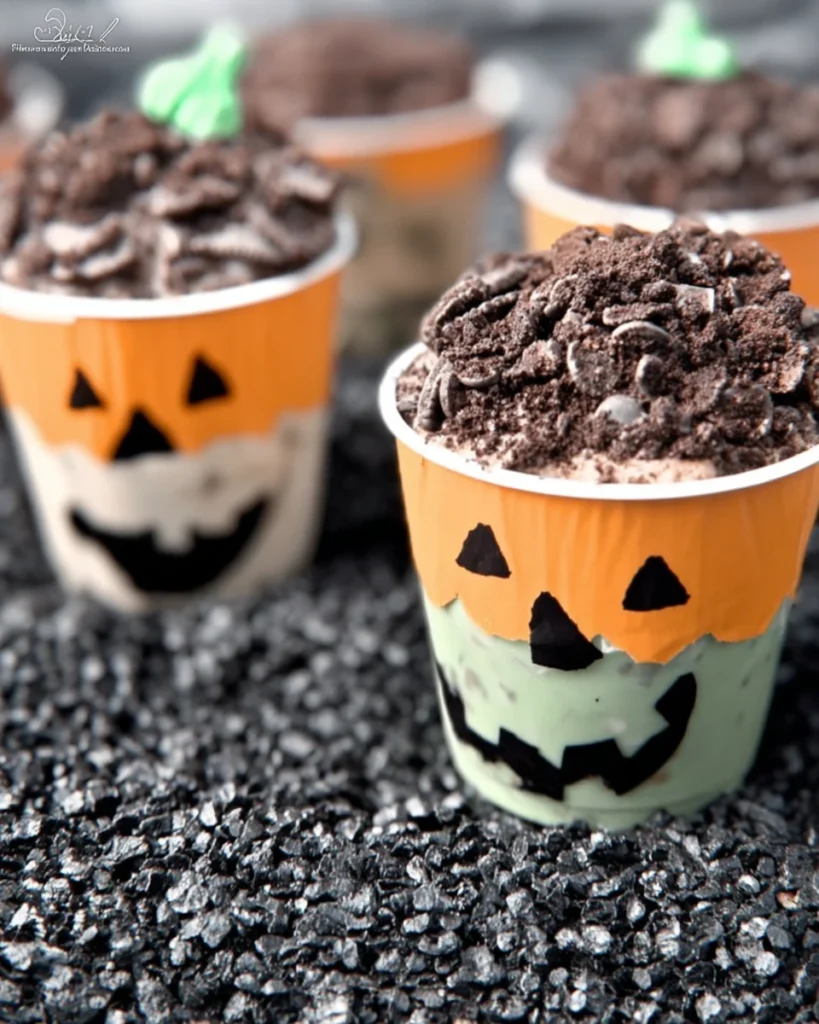
Fill the Cups
Spoon the orange pudding into 2-4 clear plastic cups, filling each about an inch or two from the top to leave room for the next layer. The cups should start looking festive already!
Prepare Oreo Crumbs
Place 5 Oreo cookies into a food processor and pulse lightly until they become coarse crumbs. Sprinkle these crumbs generously over each filled cup to add a delightful crunch that complements the creamy pudding.
Decorate with Jack-o’-Lantern Faces
Using a Sharpie marker, draw playful jack-o-lantern faces on the front of each cup to give your dessert a trendy Halloween twist! This small detail adds charm and excitement to your creations.
Preparing the Green Pudding Layer
Repeat with the Second Box of Pudding
Follow the same initial steps with the second box of pudding mix. Whisk it together with 2 cups of milk until blended smoothly. You’ll notice how easy this process becomes!
Set and Color the Mixture
Let this mixture set for a few moments. Then, add green food coloring to achieve a Frankenstein-inspired color that’ll complement the orange layer beautifully.
Layer the Green Pudding
Carefully spoon the green pudding over the already filled cups, layering it on top of the orange pudding for a spooky effect. The sight of these colorful layers will make your heart sing!
Top with Cookie Crumbs Again
Repeat the process of sprinkling the Oreo crumbs over the green pudding layer to maintain fun textures in each cup. This crunchy topping is key for added dimension.
Create Frankenstein Faces
Once more, grab your Sharpie and draw unique Frankenstein faces on the front of these cups to complement your ghostly creations! Personal touches make all the difference.
Serving Suggestions
Serve these Halloween Pudding Cups at parties, school events, or as festive treats for your family. Pair with themed plates and napkins to enhance the spooky atmosphere. Consider adding some Halloween music or decorations for extra flair!
Tips for Success
- Use gel food coloring for a more vibrant hue. It’s perfect for achieving those bright Halloween colors!
- Refrigerate the cups for an hour before serving to help the layers set and chill properly. This step greatly enhances the texture.
- For an even more festive look, consider topping with whipped cream or candy eyes. These additions will elevate your cups to the next level!
Variations
- Substitute chocolate pudding for the white chocolate for a darker twist that adds richness.
- Add gummy worms or spooky candy on top for a visual treat. Kids love this fun addition!
- Use different colors to create a rainbow effect. This customization offers endless possibilities.

FAQs
Can I make these pudding cups in advance?
Yes, you can prepare the pudding cups a day ahead; just keep them refrigerated. This is a great way to ease the stress before your event.
Can I use other colors besides orange and green?
Absolutely! Get creative with colors for different occasions or your personal preference. The more colorful, the better!
How long do these pudding cups last in the fridge?
They should be consumed within 3-4 days for optimal freshness. Just keep them covered to maintain their quality.
Can I make them dairy-free?
Yes! Substitute the milk with a non-dairy alternative like almond or coconut milk. This way, everyone can enjoy them!
What can I use instead of Oreo crumbs for a gluten-free option?
Try gluten-free cookie crumbs or crushed gluten-free graham crackers. There’s always a way to enjoy these spooky treats.
These Halloween Pudding Cups encapsulate the spirit of the holiday, offering both fun and flavor in a delightful presentation that everyone will enjoy. Easy to make and customize, they promise to be the star of your Halloween snack lineup! Celebrate with bold colors and flavors that capture the essence of this spooky season, making unforgettable memories with every delicious spoonful.
Print
Halloween Pudding Cups
These Halloween Pudding Cups are a delightful mix of creamy and crunchy textures that make them perfect for parties or family gatherings. Easy to customize, they bring festive fun to any table.
- Total Time: 15 minutes
- Yield: 4 servings 1x
Ingredients
- 2 boxes of white chocolate instant pudding
- 4 cups of milk
- Orange food coloring
- Green food coloring
- 10 Oreo cookies
Instructions
- Whisk one box of pudding mix with 2 cups of milk until smooth.
- Let it set until thick, then add orange food coloring.
- Fill cups with the orange pudding layer.
- Crush Oreo cookies and sprinkle on top.
- Draw jack-o'-lantern faces on cups.
- Repeat with the second box of pudding, adding green food coloring.
- Layer the green pudding on top of the orange.
- Top with Oreo crumbs and create Frankenstein faces.
Last Step:
Please leave a rating and comment letting us know how you liked this recipe! This helps our business to thrive and continue providing free, high-quality recipes for you.Notes
Use gel food coloring for brighter hues.
Refrigerate cups for an hour before serving for better texture.
Top with whipped cream or candy eyes for extra flair.
- Prep Time: 15 minutes
- Cook Time: 0 minutes
- Category: Dessert
- Method: No-Bake
- Cuisine: American
Nutrition
- Calories: 200
- Sugar: 12
- Sodium: 150
- Fat: 10
- Saturated Fat: 5
- Unsaturated Fat: 3
- Trans Fat: 0
- Carbohydrates: 26
- Fiber: 1
- Protein: 3
- Cholesterol: 15