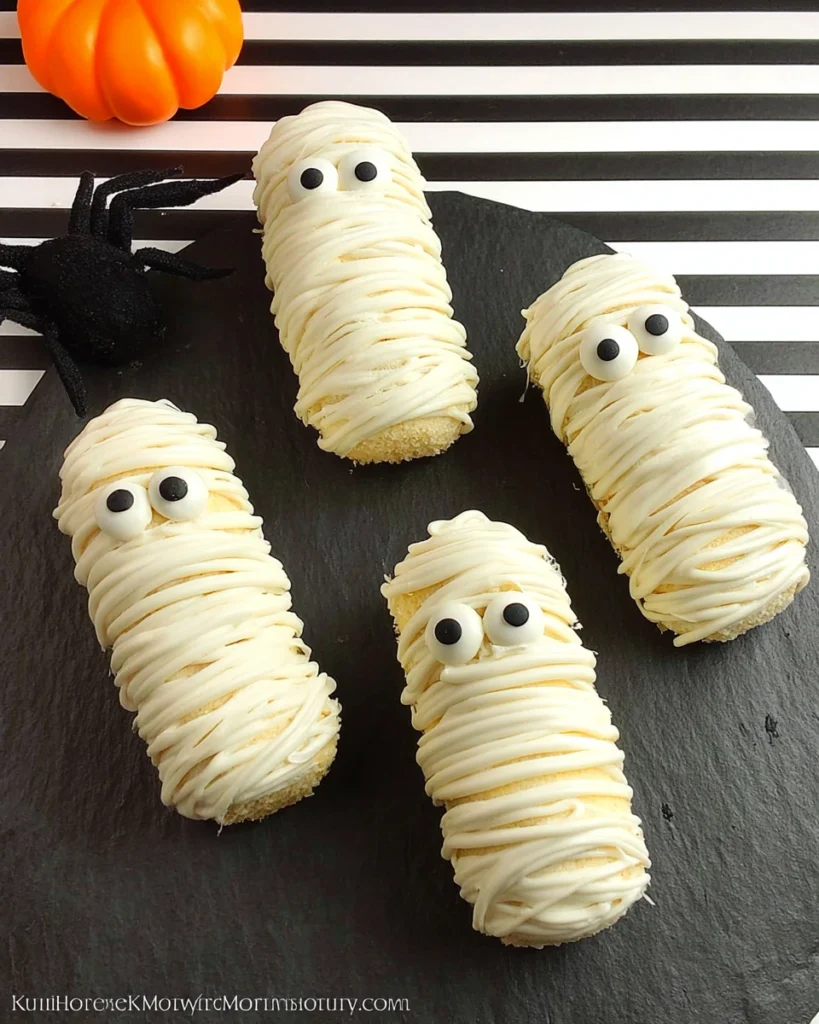
Creating Halloween Mummy Twinkies is a fantastic way to celebrate the spookiest time of year! These adorable treats not only capture the essence of Halloween but also bring a dash of creativity and fun into your kitchen. Using classic Twinkies as a base, you can transform them into delightful mummies with just a few simple ingredients. Imagine the kids’ faces lighting up when they see these spooky snacks! The combination of creamy white chocolate and charming edible eyes gives them a playful look that’s perfect for Halloween parties, school events, or just enjoying at home. Plus, the best part? They’re super easy to make! Gather your family, roll up your sleeves, and get ready to create some memorable Halloween Mummy Twinkies that everyone will love.
Why This Recipe Works
Creating Halloween Mummy Twinkies combines simplicity with creativity, making it an ideal recipe for families to enjoy. The melting chocolate provides a delicious coating that enhances the classic taste of Twinkies, while the edible eyes add a playful, spooky charm. With just a few ingredients and minimal effort, you can craft an eye-catching treat that delights both kids and adults.
Why You’ll Love This Halloween Mummy Twinkies
These Halloween Mummy Twinkies are not only visually appealing but also provide a nostalgic taste that everyone loves. The perfect balance of sweetness and creaminess ensures they are truly irresistible. The joy of making these with your family will become a cherished tradition, ensuring each Halloween is filled with laughter and creativity.

Ingredients
- 1 box of Twinkies
- 1 bag of Ghirardelli white chocolate melting chips
- 1 package of small edible eyes
- 1 disposable piping bag
- 1 cookie sheet fitted with wax paper
Preparing Your Halloween Mummy Twinkies

Unwrap the Twinkies
Start by carefully unwrapping each Twinkie and placing them onto a cookie sheet lined with wax paper. This will prevent sticking and make for easy clean-up. It’s important to keep everything organized as you go along, creating a fun atmosphere for your little ghouls and goblins.
Melt the White Chocolate
In a microwave-safe bowl, melt the Ghirardelli white chocolate melting chips according to package instructions until smooth and creamy. Ensure there are no lumps for a flawless coating. Stirring every 30 seconds will help ensure an even melt and a beautiful glossy finish. The aroma of melting chocolate is sure to get everyone in the Halloween spirit!
Apply the Eyes
Once the Twinkies are unwrapped and the chocolate is melted, quickly place two small edible eyes onto each Twinkie. This step adds the fun mummy face! Be sure to position the eyes close together to heighten the cuteness factor. Children will love getting involved in this part, giggling at how their mummies come to life!
Cool the Twinkies
Transfer the adorned Twinkies onto the wax paper and place them in the fridge for approximately 10 minutes, allowing the chocolate to set. This will make the chocolate firm up nicely while also creating a nice little break for everyone. You might even enjoy a few giggles while debating the best placement for the eyes!
Drizzle the White Chocolate
While the Twinkies are cooling, scoop the melted chocolate into a disposable piping bag. Cut a small tip of the bag to achieve a fine drizzle. When the Twinkies are firm, take them from the fridge and drizzle chocolate back and forth over each to create the mummy wrap effect. This part allows creativity to shine—don’t worry about it being perfect! The more whimsical the drizzles, the better.
Harden and Enjoy
After drizzling the chocolate, let the Mummy Twinkies sit out for about 30 minutes to harden completely. Once set, they are ready to serve and enjoy! Serve them up on a platter and watch the fun unfold as everyone reaches for their spooky treat.
Serving Suggestions
Serve these Halloween Mummy Twinkies on a spooky platter surrounded by Halloween-themed decorations. Adding cobwebs made from cotton or placing them on a plate sprinkled with “graveyard dirt” (chocolate crumbs) adds an extra layer of fun. Pair them with other treats like ghost cookies or pumpkin cupcakes for a festive spread. Don’t forget to capture the moment with photos; these treats are just too cute to resist!
Tips for Success
- Ensure the white chocolate is fully melted to coat evenly without clumping. Lumps can cause frustration when trying to make that perfect drizzle, so patience is key.
- Work quickly when placing the edible eyes and drizzling chocolate to avoid the chocolate hardening. A little urgency helps keep everything looking fresh and fun.
- Keep Mummy Twinkies refrigerated if you’re not serving them immediately to maintain their freshness. This keeps them looking perfect for any last-minute gatherings, too.
Variations
- Add colored sprinkles or edible glitter on top for extra flair. Kids will love making them sparkle!
- Use dark chocolate melting chips instead for a richer chocolate flavor. This can give a more intense taste that some people prefer.
- Instead of Twinkies, try using other sponge cakes for different textures and tastes. Angel food cake or even homemade sponge cakes can bring a new twist to your mummies.

FAQs
Q1: Can I use other types of chocolate?
A1: Yes! You can use milk or dark chocolate, but remember that it may alter the flavor profile.
Q2: How long will the Mummy Twinkies stay fresh?
A2: They are best consumed within 3-5 days if stored in an airtight container in the refrigerator.
Q3: Can I make these ahead of time?
A3: Absolutely! You can prepare Mummy Twinkies one or two days in advance.
Q4: Is there a gluten-free option for this recipe?
A4: Yes! Use gluten-free snack cakes in place of Twinkies to accommodate gluten sensitivities.
Q5: What can I do with leftover melted chocolate?
A5: Pour it onto parchment paper, let it set, and break it into shards for a delicious chocolate snack!
This recipe for Halloween Mummy Twinkies highlights the joy of festive cooking while maintaining a balance of fun and flavor. They’re an excellent craft for families, making sweets that embody the playful spirit of Halloween. Enjoy creating these spooky treats and cherish the smiles they bring to both kids and adults alike!
Print
Halloween Mummy Twinkies
Halloween Mummy Twinkies are a delightful treat that brings together creamy white chocolate and Twinkies. This easy recipe is perfect for family fun and celebrations!
- Total Time: 25 minutes
- Yield: 12 servings 1x
Ingredients
- 1 box of Twinkies
- 1 bag of Ghirardelli white chocolate melting chips
- 1 package of small edible eyes
- 1 disposable piping bag
- 1 cookie sheet fitted with wax paper
Instructions
- Unwrap each Twinkie and place them on the wax paper-lined cookie sheet.
- Melt the white chocolate melting chips in a microwave-safe bowl until smooth.
- Place two small edible eyes on each Twinkie once the chocolate is melted.
- Cool the Twinkies in the fridge for about 10 minutes.
- Scoop melted chocolate into the piping bag; drizzle over the Twinkies.
- Let the Twinkies sit for about 30 minutes to harden before serving.
Last Step:
Please leave a rating and comment letting us know how you liked this recipe! This helps our business to thrive and continue providing free, high-quality recipes for you.Notes
Make sure the white chocolate is fully melted for an even coat.
Work quickly when applying the eyes and drizzling chocolate.
Store Mummy Twinkies in the refrigerator to keep them fresh.
- Prep Time: 15 minutes
- Cook Time: 10 minutes
- Category: Dessert
- Method: No-Bake
- Cuisine: American
Nutrition
- Calories: 180
- Sugar: 16
- Sodium: 120
- Fat: 8
- Saturated Fat: 4.5
- Unsaturated Fat: 2.5
- Trans Fat: 0
- Carbohydrates: 26
- Fiber: 0
- Protein: 1
- Cholesterol: 10